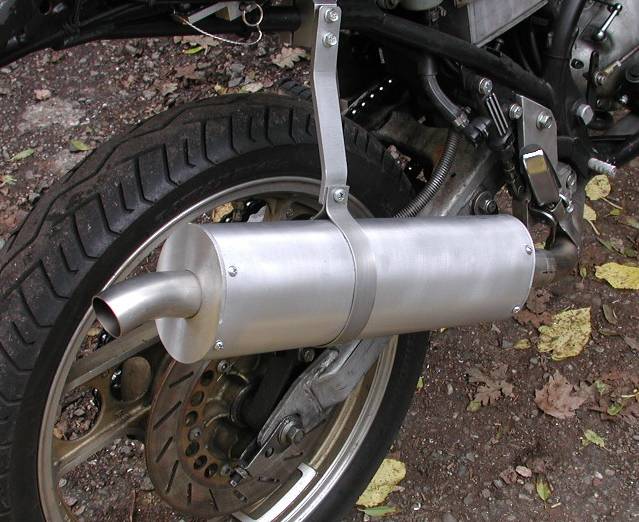
Making your own Muffler/ slip on from scratch
I started with a piece of 4“ aluminum tubing which I squished between two boards in the vise to a pleasing-looking oval. Then I traced the ends of the oval onto 1/2” 6061 aluminum stock and cut the end caps on the band saw. A little work with the disk sander and the end caps matched the oval canister quite well.
Then (the scary part) I mounted my router in the router table with a carbide cutter. I fastened a piece of wood to the fence and advanced it into the cutter so the cutter was finally exposed by about .1“, with a height of about 3/8”. I was then able to cut the rabbet in the end caps, depth about .1“ and height 3/8”. This rabbet allowed the outside of the can to line up flush with the outer edge of the end caps. Next time I think I'll see about a speed control for the router.
Then I bored holes in the end caps to clear the 1.5“ stainless tubing used for the tail piece and the inlet spigot, inserted the end caps into the canister and drilled the mounting holes for the caps.
I made two steel disks with center hole to match the OD of the tailpipe and inlet spigot and welded them to the pipes, then drilled them and tapped matching blind holes in the end caps. I left about an inch of each pipe extending past the disks inside the can.
I went down to the local muffler shop and had them cut me a piece of 1.5” steel tailpipe just short of the distance between the end caps on the inside, then bell the ends for an easy slip fit over the spigot ends.
I wasn't enthusiastic about drilling 1000 or 1200 holes in the baffle pipe, and the muffler shop's owner (a hardcore motorcyclist and former racer) suggested I cut slits instead.
It worked beautifully. With a carbide blade in my radial arm saw, I adjusted the blade's height to about 1.3“ above the table, then put the baffle pipe in place and drew the blade across it making slits about an inch long or so. Twenty slits down the length, then rotate the pipe 120 degrees, twenty more, then rotate and cut the remaining 20 slits.
This exercise probably took about 20 minutes. I'd have been drilling for hours.
I took a punch and louvered the leading edge of each slit, but I don't really think it made much difference. Easy enough to do, though.
The baffle pipe was now a nice slip fit on the spigot ends inside the can.
I bought some fiberglass muffler packing from Cycle Gear (the 4 stroke stuff, which is much denser and holds up better), wrapped it around the baffle pipe and assembled the muffler.
A couple of brackets and Bob was my uncle.
Here's picture: http://www.strappe.com/pics/B50/b50pipe2.jpg
This BSA single is painfully loud with a straight pipe but quite civilized with this muffler. I'd been using a motocross Supertrapp, and when I changed to this one the sound level went down about 20db. And I had to increase the main jet three steps. With a nice increase in power.
So the muffler is quieter and makes more power. Just what I had in mind…