Hi,
well having lived in the Sugar Cane belt of a small island which only had gravel style roads I know your feeling.
I would ride to work all week thro this dust roads to the blacktop into town. Friday night I would take the chain of and soak it in paraffin/pitch oil/kerosene whilst it was still warm from the retun ride.
Leave it overnight and use a tooth brush to get any residual crap off (most just fell off) I then hung the chain and sprayed it with foaming chain oil both sides (put a pan under the chain).
Once the foam had "set" as grease I would put the chain back on the bike ready for monday morning
Sprockets were tooth brushed clean whilst the chain way drying/soaking .
Chains & sprocket sets were good for about 3000 miles (just about a year )
Word of warning a lazy neighbour used a high pressure washer on his chains and wondered why his chain only last about 3 months . Probably due to turning the lube on the chain rollers to valve grinding paste <BG>
As for the footpeg a picture is worth a 1000 words.
Intro, eating crow, which way to go help?
Moderators: Site Director, FZR Forum Moderators
-
yamaha_george
- 5000+ Posts

- Posts: 5853
- Joined: Fri May 09, 2008 8:46 am
- Location: west london UK


Re: Intro, eating crow, which way to go help?
I definetly agree with you on the value of pictures. Unfortunetly, I don't have the option currently. Soon enough though. Not that this helps probably, but the piece of metal that the footpeg pivot assembly connects to is literally a couple centimeters from the chain whilst the bike is shut down. More specifically, its the rear bolt that is so close. The piece of rubber material that guards the chain from the swing arm is actually touching the inner rear of the footpeg where pivots up.
Ill get the pic problem resolved soon.
Ill get the pic problem resolved soon.
"Upgrades"/ Miscellaneous Ideas Stolen From You Guys
- KnN Air filter
-Yamalube/ filter (I consider this an upgrade based on improved tranny performance from whatever oil PO was using.)
-Pirelli Demon Sport Tourings (110/70/17 front 140/70/18 rear)
-all turn signals yanked (flush mount's for front not ordered yet)
-recessed the brake light
To-Do List (in order of importance/ personal preference)
-520 Quick Acceleration kit (undecided due to long distance commuting)
-flush mounted front turnsignals (direct bolt on)
-mirror replacement (direct bolt on, maybe integrated if I can figure out how to install)
-repair minor fairing cracks, scratches and paint flat black (windshield as well)
-fenderectomy of sorts
-1995 YZF Supersport Tail Conversion (if a reasonable option presents itself)
-
yamaha_george
- 5000+ Posts
- Posts: 5853
- Joined: Fri May 09, 2008 8:46 am
- Location: west london UK
Re: Intro, eating crow, which way to go help?
E,emt803 wrote:I definetly agree with you on the value of pictures. Unfortunetly, I don't have the option currently. Soon enough though. Not that this helps probably, but the piece of metal that the footpeg pivot assembly connects to is literally a couple centimeters from the chain whilst the bike is shut down. More specifically, its the rear bolt that is so close. The piece of rubber material that guards the chain from the swing arm is actually touching the inner rear of the footpeg where pivots up.
Ill get the pic problem resolved soon.
take a look at this :-
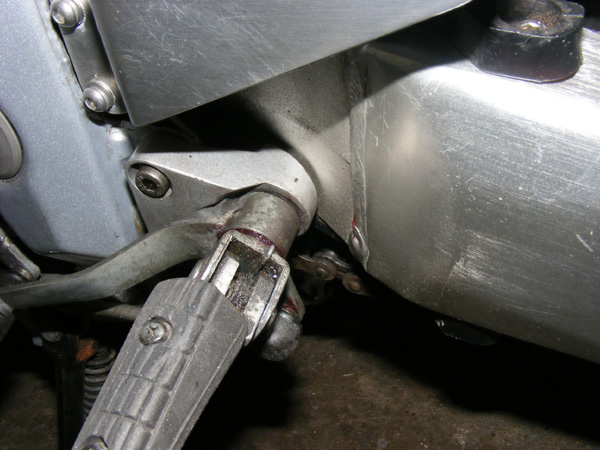
Is your closer than that ?


Re: Intro, eating crow, which way to go help?
Cotter pin = split pin in the US. :fyi: 
'92 FZR600
Race Tech Springs & Gold Valve Emulators * '06 R6 MC & Calipers * '06 R6 Rear Shock
130 Dynojet Mains/Pods/Flo-Comander * Full Yoshi Exhaust w/ Custom Can
'06 R6 VR * Full OEM Clutch * 14/49 520 Gearing
Seca II Triple w/ Modded Sport Tour Bars * Aztec8 Dual 4" w/ 4100K Halagon lamps * LED Tail/Turn Signals * Vapor Gauges
Lots of Powder
Re: Intro, eating crow, which way to go help?
I just went outside and did a side by side, and George, it appears that my entire footpeg assembly is well below my swing arm. Like entirely. The upper of the two bolts that connect to the frame is level with the lower swingarm chain guard and the chain hangs level with the lower bolt and within a cm or two of the nut on back. I lubed the chain well and instantly noticed improvement and don't feel the vibration or see more visible scratches on the chain rivets. I'm more concerned with the change in angle of the shifter to the gear box if there even is one. I wish I could find a way to resize my phone pics. I'm sure that this is frustrating for the members here and I do apologize and appreciate your help.
On a different note, in regards to the infamous pin on the rear axle, is there a specific gauge I could get from an auto store or do I need ro go back to the stealership and pay twice what its worth. I'm assuming I shouldn't reuse the old one.
On a different note, in regards to the infamous pin on the rear axle, is there a specific gauge I could get from an auto store or do I need ro go back to the stealership and pay twice what its worth. I'm assuming I shouldn't reuse the old one.
"Upgrades"/ Miscellaneous Ideas Stolen From You Guys
- KnN Air filter
-Yamalube/ filter (I consider this an upgrade based on improved tranny performance from whatever oil PO was using.)
-Pirelli Demon Sport Tourings (110/70/17 front 140/70/18 rear)
-all turn signals yanked (flush mount's for front not ordered yet)
-recessed the brake light
To-Do List (in order of importance/ personal preference)
-520 Quick Acceleration kit (undecided due to long distance commuting)
-flush mounted front turnsignals (direct bolt on)
-mirror replacement (direct bolt on, maybe integrated if I can figure out how to install)
-repair minor fairing cracks, scratches and paint flat black (windshield as well)
-fenderectomy of sorts
-1995 YZF Supersport Tail Conversion (if a reasonable option presents itself)
- KnN Air filter
-Yamalube/ filter (I consider this an upgrade based on improved tranny performance from whatever oil PO was using.)
-Pirelli Demon Sport Tourings (110/70/17 front 140/70/18 rear)
-all turn signals yanked (flush mount's for front not ordered yet)
-recessed the brake light
To-Do List (in order of importance/ personal preference)
-520 Quick Acceleration kit (undecided due to long distance commuting)
-flush mounted front turnsignals (direct bolt on)
-mirror replacement (direct bolt on, maybe integrated if I can figure out how to install)
-repair minor fairing cracks, scratches and paint flat black (windshield as well)
-fenderectomy of sorts
-1995 YZF Supersport Tail Conversion (if a reasonable option presents itself)
Re: Intro, eating crow, which way to go help?
Take the old one with you to the auto parts store...
1989 3LN1 FZR250R, currently stock.
TTR Ignition Systems
TCI Repair and Ignition Transistor Upgrade
VRR Adaptor Harness
YZF600 TCI Adaptor
Running Light Fuse Carrier
TTR Ignition Systems
TCI Repair and Ignition Transistor Upgrade
VRR Adaptor Harness
YZF600 TCI Adaptor
Running Light Fuse Carrier
Re: Intro, eating crow, which way to go help?
Actually thought about that, but seeing as I'll be on the bike I might not wanna take it off haha . I guess I will just go outside and compare. From that response however I am assuming that they will carry them at a common auto store. I didn't know if it was another one of those specialty items that. Yamaha had the market cornered on haha
"Upgrades"/ Miscellaneous Ideas Stolen From You Guys
- KnN Air filter
-Yamalube/ filter (I consider this an upgrade based on improved tranny performance from whatever oil PO was using.)
-Pirelli Demon Sport Tourings (110/70/17 front 140/70/18 rear)
-all turn signals yanked (flush mount's for front not ordered yet)
-recessed the brake light
To-Do List (in order of importance/ personal preference)
-520 Quick Acceleration kit (undecided due to long distance commuting)
-flush mounted front turnsignals (direct bolt on)
-mirror replacement (direct bolt on, maybe integrated if I can figure out how to install)
-repair minor fairing cracks, scratches and paint flat black (windshield as well)
-fenderectomy of sorts
-1995 YZF Supersport Tail Conversion (if a reasonable option presents itself)
- KnN Air filter
-Yamalube/ filter (I consider this an upgrade based on improved tranny performance from whatever oil PO was using.)
-Pirelli Demon Sport Tourings (110/70/17 front 140/70/18 rear)
-all turn signals yanked (flush mount's for front not ordered yet)
-recessed the brake light
To-Do List (in order of importance/ personal preference)
-520 Quick Acceleration kit (undecided due to long distance commuting)
-flush mounted front turnsignals (direct bolt on)
-mirror replacement (direct bolt on, maybe integrated if I can figure out how to install)
-repair minor fairing cracks, scratches and paint flat black (windshield as well)
-fenderectomy of sorts
-1995 YZF Supersport Tail Conversion (if a reasonable option presents itself)
-
yamaha_george
- 5000+ Posts
- Posts: 5853
- Joined: Fri May 09, 2008 8:46 am
- Location: west london UK
Re: Intro, eating crow, which way to go help?
DB,delvryboy wrote:Cotter pin = split pin in the US. :fyi:
Wrong , it is a mistake caused by common usage not the science. a cotter pin is literally a pin with a taper ground along one side to act as a wedge as those pins on bicycle pedal cranks to bottom bracket axle.
They are knocked in and the pure friction holds the lot in place.
A split pin goes throught the objects to be fastened and then the split is used as a safety anti vibration locking device.
see:-
http://bikesmithdesign.com/CotterPress/
PLEASE NOTE this is a US site !!!!
like wise for splitpin see:-
http://www.google.co.uk/search?q=split+ ... d=0CGoQsAQ
I do not see a single picture of a cotter there.
Re: Intro, eating crow, which way to go help?
YG - I note that in the document you referenced, there is not ONE use of the word "pin"; these tapered fasteners are referred to repeatedly as "spindles".
Going the other direction:
http://tasmanindustries.co.uk/index.php ... KgodqwmDbA - UK Site
http://www.roymech.co.uk/Useful_Tables/ ... _Pins.html - UK Site
http://www.fastfixdirect.co.uk/code/nav ... tegoryID=7 - UK Site
http://www.engineersedge.com/cotter_pin.htm - copy of an ANSI document; hardly "vernacular"
http://en.wikipedia.org/wiki/Cotter_pin - note that even in the "British usage" category, the piece is referred to as a "Cotter", and not a "Cotter Pin".

We now return to your regularly scheduled discussion of motorcycles...
Going the other direction:
http://tasmanindustries.co.uk/index.php ... KgodqwmDbA - UK Site
http://www.roymech.co.uk/Useful_Tables/ ... _Pins.html - UK Site
http://www.fastfixdirect.co.uk/code/nav ... tegoryID=7 - UK Site
http://www.engineersedge.com/cotter_pin.htm - copy of an ANSI document; hardly "vernacular"
http://en.wikipedia.org/wiki/Cotter_pin - note that even in the "British usage" category, the piece is referred to as a "Cotter", and not a "Cotter Pin".
We now return to your regularly scheduled discussion of motorcycles...
1989 3LN1 FZR250R, currently stock.
TTR Ignition Systems
TCI Repair and Ignition Transistor Upgrade
VRR Adaptor Harness
YZF600 TCI Adaptor
Running Light Fuse Carrier
TTR Ignition Systems
TCI Repair and Ignition Transistor Upgrade
VRR Adaptor Harness
YZF600 TCI Adaptor
Running Light Fuse Carrier
Re: Intro, eating crow, which way to go help?
Not in the States.yamaha_george wrote:DB,delvryboy wrote:Cotter pin = split pin in the US. :fyi:
Wrong , it is a mistake caused by common usage not the science. a cotter pin is literally a pin with a taper ground along one side to act as a wedge as those pins on bicycle pedal cranks to bottom bracket axle.
They are knocked in and the pure friction holds the lot in place.
A split pin goes throught the objects to be fastened and then the split is used as a safety anti vibration locking device.
see:-
http://bikesmithdesign.com/CotterPress/
PLEASE NOTE this is a US site !!!!
like wise for splitpin see:-
http://www.google.co.uk/search?q=split+ ... d=0CGoQsAQ
I do not see a single picture of a cotter there.
'92 FZR600
Race Tech Springs & Gold Valve Emulators * '06 R6 MC & Calipers * '06 R6 Rear Shock
130 Dynojet Mains/Pods/Flo-Comander * Full Yoshi Exhaust w/ Custom Can
'06 R6 VR * Full OEM Clutch * 14/49 520 Gearing
Seca II Triple w/ Modded Sport Tour Bars * Aztec8 Dual 4" w/ 4100K Halagon lamps * LED Tail/Turn Signals * Vapor Gauges
Lots of Powder
Re: Intro, eating crow, which way to go help?
Look at the parts fiche:
http://www.bikebandit.com/houseofmotorc ... #sch132380
Lol, notice how it says USA under it. LOL, you blokes would be trying to hammer a steel wedge in the hole if it didn't say that.
http://www.bikebandit.com/houseofmotorc ... #sch132380
Lol, notice how it says USA under it. LOL, you blokes would be trying to hammer a steel wedge in the hole if it didn't say that.
'92 FZR600
Race Tech Springs & Gold Valve Emulators * '06 R6 MC & Calipers * '06 R6 Rear Shock
130 Dynojet Mains/Pods/Flo-Comander * Full Yoshi Exhaust w/ Custom Can
'06 R6 VR * Full OEM Clutch * 14/49 520 Gearing
Seca II Triple w/ Modded Sport Tour Bars * Aztec8 Dual 4" w/ 4100K Halagon lamps * LED Tail/Turn Signals * Vapor Gauges
Lots of Powder
Race Tech Springs & Gold Valve Emulators * '06 R6 MC & Calipers * '06 R6 Rear Shock
130 Dynojet Mains/Pods/Flo-Comander * Full Yoshi Exhaust w/ Custom Can
'06 R6 VR * Full OEM Clutch * 14/49 520 Gearing
Seca II Triple w/ Modded Sport Tour Bars * Aztec8 Dual 4" w/ 4100K Halagon lamps * LED Tail/Turn Signals * Vapor Gauges
Lots of Powder
Re: Intro, eating crow, which way to go help?
Out of all the things mentioned in this thread, The Rear Axles Metal Pin (we can call it a T.R.A.M.P pin for short haha) has sparked the biggest debate. Did I mention, MY LEFT FOOT PEG ASSEMBLY IS APPARENTLY IN A DIFFERENT POSITION AFTER A DROP... Haha.... Seriously though, I think there's a logical explanation and I know it wasn't bent that severely... At least I hope not.
"Upgrades"/ Miscellaneous Ideas Stolen From You Guys
- KnN Air filter
-Yamalube/ filter (I consider this an upgrade based on improved tranny performance from whatever oil PO was using.)
-Pirelli Demon Sport Tourings (110/70/17 front 140/70/18 rear)
-all turn signals yanked (flush mount's for front not ordered yet)
-recessed the brake light
To-Do List (in order of importance/ personal preference)
-520 Quick Acceleration kit (undecided due to long distance commuting)
-flush mounted front turnsignals (direct bolt on)
-mirror replacement (direct bolt on, maybe integrated if I can figure out how to install)
-repair minor fairing cracks, scratches and paint flat black (windshield as well)
-fenderectomy of sorts
-1995 YZF Supersport Tail Conversion (if a reasonable option presents itself)
- KnN Air filter
-Yamalube/ filter (I consider this an upgrade based on improved tranny performance from whatever oil PO was using.)
-Pirelli Demon Sport Tourings (110/70/17 front 140/70/18 rear)
-all turn signals yanked (flush mount's for front not ordered yet)
-recessed the brake light
To-Do List (in order of importance/ personal preference)
-520 Quick Acceleration kit (undecided due to long distance commuting)
-flush mounted front turnsignals (direct bolt on)
-mirror replacement (direct bolt on, maybe integrated if I can figure out how to install)
-repair minor fairing cracks, scratches and paint flat black (windshield as well)
-fenderectomy of sorts
-1995 YZF Supersport Tail Conversion (if a reasonable option presents itself)
Re: Intro, eating crow, which way to go help?
Measure the height of the footpegs, left and right, with the bike held upright by a helper. If there is any significant difference, pull the left bracket and inspect everything involved - including the frame 'ear' that the bracket hangs from - for bending, stretching, cracking, and just plain being torn apart.
1989 3LN1 FZR250R, currently stock.
TTR Ignition Systems
TCI Repair and Ignition Transistor Upgrade
VRR Adaptor Harness
YZF600 TCI Adaptor
Running Light Fuse Carrier
TTR Ignition Systems
TCI Repair and Ignition Transistor Upgrade
VRR Adaptor Harness
YZF600 TCI Adaptor
Running Light Fuse Carrier
Re: Intro, eating crow, which way to go help?
Actually, the ironic part is that the T.R.AM.P. Pin is the only part on the bike I was already familiar with haha
"Upgrades"/ Miscellaneous Ideas Stolen From You Guys
- KnN Air filter
-Yamalube/ filter (I consider this an upgrade based on improved tranny performance from whatever oil PO was using.)
-Pirelli Demon Sport Tourings (110/70/17 front 140/70/18 rear)
-all turn signals yanked (flush mount's for front not ordered yet)
-recessed the brake light
To-Do List (in order of importance/ personal preference)
-520 Quick Acceleration kit (undecided due to long distance commuting)
-flush mounted front turnsignals (direct bolt on)
-mirror replacement (direct bolt on, maybe integrated if I can figure out how to install)
-repair minor fairing cracks, scratches and paint flat black (windshield as well)
-fenderectomy of sorts
-1995 YZF Supersport Tail Conversion (if a reasonable option presents itself)
- KnN Air filter
-Yamalube/ filter (I consider this an upgrade based on improved tranny performance from whatever oil PO was using.)
-Pirelli Demon Sport Tourings (110/70/17 front 140/70/18 rear)
-all turn signals yanked (flush mount's for front not ordered yet)
-recessed the brake light
To-Do List (in order of importance/ personal preference)
-520 Quick Acceleration kit (undecided due to long distance commuting)
-flush mounted front turnsignals (direct bolt on)
-mirror replacement (direct bolt on, maybe integrated if I can figure out how to install)
-repair minor fairing cracks, scratches and paint flat black (windshield as well)
-fenderectomy of sorts
-1995 YZF Supersport Tail Conversion (if a reasonable option presents itself)
Re: Intro, eating crow, which way to go help?
DonTZ125 wrote:Measure the height of the footpegs, left and right, with the bike held upright by a helper. If there is any significant difference, pull the left bracket and inspect everything involved - including the frame 'ear' that the bracket hangs from - for bending, stretching, cracking, and just plain being torn apart.
Why didn't I think of that... Thank you.. I will also compare the angles of the two .. I feel like a dumbass now...
"Upgrades"/ Miscellaneous Ideas Stolen From You Guys
- KnN Air filter
-Yamalube/ filter (I consider this an upgrade based on improved tranny performance from whatever oil PO was using.)
-Pirelli Demon Sport Tourings (110/70/17 front 140/70/18 rear)
-all turn signals yanked (flush mount's for front not ordered yet)
-recessed the brake light
To-Do List (in order of importance/ personal preference)
-520 Quick Acceleration kit (undecided due to long distance commuting)
-flush mounted front turnsignals (direct bolt on)
-mirror replacement (direct bolt on, maybe integrated if I can figure out how to install)
-repair minor fairing cracks, scratches and paint flat black (windshield as well)
-fenderectomy of sorts
-1995 YZF Supersport Tail Conversion (if a reasonable option presents itself)
- KnN Air filter
-Yamalube/ filter (I consider this an upgrade based on improved tranny performance from whatever oil PO was using.)
-Pirelli Demon Sport Tourings (110/70/17 front 140/70/18 rear)
-all turn signals yanked (flush mount's for front not ordered yet)
-recessed the brake light
To-Do List (in order of importance/ personal preference)
-520 Quick Acceleration kit (undecided due to long distance commuting)
-flush mounted front turnsignals (direct bolt on)
-mirror replacement (direct bolt on, maybe integrated if I can figure out how to install)
-repair minor fairing cracks, scratches and paint flat black (windshield as well)
-fenderectomy of sorts
-1995 YZF Supersport Tail Conversion (if a reasonable option presents itself)