Gota agree very nice work, but should this not be in the "Videos & Pictures" forum?
I thought the 600 Garage was for technical issue's, I love pics tho.
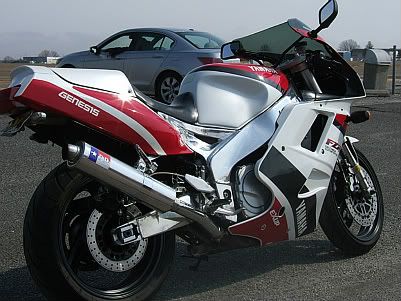
The rebuild goes on- Pics!- Complete
Moderators: Site Director, FZR Forum Moderators

Re: The rebuild goes on- Pics!
Now that you mention it I think your right! Sorry about that. Rookie mistake.
2005 FJR1300- Daily ride
1990 FZR600- Stock
1984 KR RZ350- Restored
1990 FZR600- Stock
1984 KR RZ350- Restored
Re: The rebuild goes on- Pics!
More progress being made. Wheels painted and tires mounted. Found a V&H can on ebay too.


Last edited by lewdog on Thu Dec 30, 2010 9:13 am, edited 1 time in total.
2005 FJR1300- Daily ride
1990 FZR600- Stock
1984 KR RZ350- Restored
1990 FZR600- Stock
1984 KR RZ350- Restored
-
kiki231

- 50+ Posts

- Posts: 71
- Joined: Wed Nov 03, 2010 11:13 am
- Location: East Coast of Canada
- Contact:
Re: The rebuild goes on- Pics!
WOW!
couple more questions -- what brand of grips are you using? they look better than stock.
Did you polish your plastic lenses?
thanks!
Chris
couple more questions -- what brand of grips are you using? they look better than stock.
Did you polish your plastic lenses?
thanks!
Chris
When things get expensive, I become a fast learner...
[i]1989 FZR600
2009 R1[/i]
[i]1989 FZR600
2009 R1[/i]
-
fzrbrandon

- Level 7.5

- Posts: 762
- Joined: Mon Oct 06, 2008 3:21 pm
- Location: North Hollywood, CA
- Contact:
Re: The rebuild goes on- Pics!
I'll say it again - Darn nice looking FZR600 so far. The chain guard even looks brand new! 
92 FZR600 - 3EN2 400 swingarm, Micron, DynoJet, Factory Pro, K&N, R6 shock, RT springs/emulators, R6 MC, Galfer, YZF calipers, Vortex, RK, YZF/R6 VR/R, Vortex, Zero Gravity
90 FZR400 - Sharkskinz, D&D, Sudco, DynoJet, Factory Pro, Ohlins, RT springs/emulators, JEM Machine, Woodcraft, NRC, Galfer, Vortex, RK, YZF/R6 VR/R, Vortex, Lockhart Phillips
89 FZR600 - Vance & Hines, DynoJet, Zero Gravity - sold in '91
http://www.fzrbrandon.com
!!! 400 & 600 Parts For Sale !!! viewtopic.php?f=18&t=9971


Re: The rebuild goes on- Pics!
You can color me impressed. Awesome build. And I'm not going to lie, I'm really really jealous of your garage!
1994 FZR600: Hardly anything left stock

02 R6 Front End
Ducati M900 Seat/Taillight
Honda VFR750 Swingarm/Wheel
No Spacer 660
YZF600 Tank
Renthal Dirt Bars
Too much else...
02 R6 Front End
Ducati M900 Seat/Taillight
Honda VFR750 Swingarm/Wheel
No Spacer 660
YZF600 Tank
Renthal Dirt Bars
Too much else...
Re: The rebuild goes on- Pics!
Thats gona be 1 sweet bike when its done.....factory fresh...Nice 
Steve
Steve

Re: The rebuild goes on- Pics!
My lord, look at the coolant res. Look likes you can use it as a cantine.... Such a clean build. I hope HOPE mine comes out half as nice =X
1992 FZR 1000
:Under serious re-construction:
:Under serious re-construction:


Re: The rebuild goes on- Pics!
are you going to be entering it in any competitions? it does look awesome but I notice you stuck with the candy bar type VR that's so hated for being faulty so I'm wondering if you're trying to keep it perfectly stock
Re: The rebuild goes on- Pics!
2005 FJR1300- Daily ride
1990 FZR600- Stock
1984 KR RZ350- Restored
1990 FZR600- Stock
1984 KR RZ350- Restored


Re: The rebuild goes on- Pics!
just amazing
Upgrades:
- Barnett Clutch------------------------------------------R6 Blue Dots, Front Master Brake Cylinder+Reservoir
WP Adjustable Rear Shock----------------------------Vortex 520 Conversion with RK GB520GXW Chain
V&H Header (4-1)--------------------------------------Swingarm Spool Mounts
Cobra F1r Exhaust Can--------------------------------R6 Voltage Regulator
Flo-Commander with Remote-------------------------Custom Airtech Passenger Seat
Stage 7 Jet kit with Diffuser Caps--------------------Factory Pro Nickel Emulsion Tubes
Wiseco 630 Kit------------------------------------------Custom Frame Slider Mounts
Modking Hydraulic Clutch Kit--------------------------Hella Projection Headlight with Xentec HID Kit (H9 Bulb)
Modking Aluminum Radiator Overflow Bottle--------


Re: The rebuild goes on- Pics!
Very nice!
Looking forward to seeing it dressed up.
Re: The rebuild goes on- Pics!
Beautiful bike...lewdog wrote:The stock VR was working fine when i rode it home after the puchase. When I reassembled it I use some heat sink paste behind it to aid in heat dissipation, cleaned up all the terminals and grounds. We'll see! I did buy the upgrade VR just in case.
The problem and danger with the VRR is that (without a voltage gauge) you can't really tell if it's going off until other things really start to go wonky and/or die. I have to assume that somewhere in that immaculate palace you call a garage you have a voltmeter / multimeter. Measure VDC across the battery terminals while holding ~ 5000 revs; if you're around 14.5v, it's good to go.
Be very careful with thermal paste - the issue with the VRRs is not heat in and of itself so much as ground-path resistance. A stock installation grounds through the VRR body, through the heat sink, through the subframe and frame to the harness to the battery. That's a lot of connections, each of which can get fouled / corroded / dirty / loose, increasing resistance and generating heat. Depending on which compound you use, and how much, the paste can itself act as an electrical insulator, rendering the VRR completely unable to do its job and thus dumping full rectified alternator voltage into the harness. (insert BOOM smiley)
I see that you have a dedicated ground wire at one of the VRR bolts - is that stock, or a mod? It will prevent a great many problems if in good condition (not something I think we need to worry about on YOUR bike!), as it bypasses the convoluted OEM ground circuit.
1989 3LN1 FZR250R, currently stock.
TTR Ignition Systems
TCI Repair and Ignition Transistor Upgrade
VRR Adaptor Harness
YZF600 TCI Adaptor
Running Light Fuse Carrier
TTR Ignition Systems
TCI Repair and Ignition Transistor Upgrade
VRR Adaptor Harness
YZF600 TCI Adaptor
Running Light Fuse Carrier


Re: The rebuild goes on- Pics!
Wow! Great looking bike. It looks showroom new, very impressive.

Re: The rebuild goes on- Pics!
Thanks dontz125 for the VR background. I never realy knew that there was not a dedicated ground wire to the VR case. This one had it as stock in the harness which goes directly to the battery. I could see how just using a case ground could cause problems. When I disassembled it there was all kinds of corrosion behind the case as well as the heat sink up against the frame bracket. The ground wire was in good shape on both ends. I replaced the complete VR socket and terminals on the harness and cleaned the VR terminals. The only reason I used heat sink paste is their are no heat sink fins on the stock VR. I figured it couldn't hurt.
2005 FJR1300- Daily ride
1990 FZR600- Stock
1984 KR RZ350- Restored
1990 FZR600- Stock
1984 KR RZ350- Restored