Project Freestyle

Got a Yamazuki or a Yamonda? This section is for those who are a little more creative...

Moderators: Site Director, FZR Forum Moderators

Post Reply
Freestyle72
Level 4.0
Level 4.0
Posts: 418
Joined: Sun May 10, 2009 8:23 am
Location: Milton, Ontario, Canada

Re: Project Freestyle

Post by Freestyle72 »

thatkid wrote:
Freestyle72 wrote:Care to enlighten me as to what pictures you want? Or worst you just don't like how it looks?

They are too dark. I can't tell the quality of the paint job on the tank.
Image

before I f*ck it up with acetone last night.
User avatar
zero9243
Level 8.5
Level 8.5
Posts: 896
Joined: Wed May 28, 2008 3:23 pm
Location: Milwaukee, WI
Contact:

Re: Project Freestyle

Post by zero9243 »

hey dude it's looking real good. keep up the good work. Have you tried weighing it at all recently? does your goal still seem realistic?
Upgrades:
  • Barnett Clutch------------------------------------------R6 Blue Dots, Front Master Brake Cylinder+Reservoir
    WP Adjustable Rear Shock----------------------------Vortex 520 Conversion with RK GB520GXW Chain
    V&H Header (4-1)--------------------------------------Swingarm Spool Mounts
    Cobra F1r Exhaust Can--------------------------------R6 Voltage Regulator
    Flo-Commander with Remote-------------------------Custom Airtech Passenger Seat
    Stage 7 Jet kit with Diffuser Caps--------------------Factory Pro Nickel Emulsion Tubes
    Wiseco 630 Kit------------------------------------------Custom Frame Slider Mounts
    Modking Hydraulic Clutch Kit--------------------------Hella Projection Headlight with Xentec HID Kit (H9 Bulb)
    Modking Aluminum Radiator Overflow Bottle--------


Freestyle72
Level 4.0
Level 4.0
Posts: 418
Joined: Sun May 10, 2009 8:23 am
Location: Milton, Ontario, Canada

Re: Project Freestyle

Post by Freestyle72 »

Mounts done for remote resevoir and coolant bottle.


The mounts drilled to go between subframe and rearset. Did both at the same time so they would have the same spacing and save me more effort lol. Yet another good use for duct tape.

Image


Testing for hole diameter

Image


Testing for spacing. Perfect fit.

Image


Seperating the two.

Image


Used a torch and bent them into an L

Image


Used the torch again and now they are a Z

Image


Coolant bottle. Gotta get some clamps for that.

Image


Shock resevoir. Gotta find the other clamp I had for that.

Image


Rear shot. Sorry for the bad lighting.

Image


Haven't weighed it yet bro. I am not sure how close to my goal I will be. I think I might actually come close but that damn sealer actually made the tank feel quite heavy. Won't know til it hits the scale.
Freestyle72
Level 4.0
Level 4.0
Posts: 418
Joined: Sun May 10, 2009 8:23 am
Location: Milton, Ontario, Canada

Re: Project Freestyle

Post by Freestyle72 »

This is just a photoshop but what are your thoughts on decal like this to cover up the paint fudge up?


Image
User avatar
Fizzinatorr
Level 6.5
Level 6.5
Posts: 662
Joined: Fri May 30, 2008 5:05 pm
Location: Middle of NJ

Re: Project Freestyle

Post by Fizzinatorr »

Previous comment retracted

Looking great!
8 Bikes so far...more coming too...Image

Finished my 2000 GSXR 750 -> Link here viewtopic.php?f=68&t=3617
Freestyle72
Level 4.0
Level 4.0
Posts: 418
Joined: Sun May 10, 2009 8:23 am
Location: Milton, Ontario, Canada

Re: Project Freestyle

Post by Freestyle72 »

Got subframe rear mounts done. Just need to cut them down to size and weld them on now. 1X1" square tubing schedule 100 went way over kill on the sizing but I get the pieces free and it will be WAY stronger than needed so that's fine.

Image

Note I spent like 2 hours dremeling those curves just right so they would hug the surface of the shock mount.
Image
thatkid
2000+ Posts
2000+ Posts
Posts: 2026
Joined: Sun May 18, 2008 1:25 am
Location: Chicago, IL
Contact:

Re: Project Freestyle

Post by thatkid »

They make these things called drill presses..... Just throwing it out there.. :)
Image
Do YOU Scopper?

"When some people cry, it's not because they’re weak. It’s because they’ve been strong for far too long."
Freestyle72
Level 4.0
Level 4.0
Posts: 418
Joined: Sun May 10, 2009 8:23 am
Location: Milton, Ontario, Canada

Re: Project Freestyle

Post by Freestyle72 »

We can't all afford that fancy equipment... I got about a $4000 shopping list that would have made this build a breeze. But since this is not my garage I don't really want to start filling it with those tools just yet. I am moving to my new house next month so I will start to acquire these tools.

Besides how would I have used a drill press to get that curve? Use a huge bit?
thatkid
2000+ Posts
2000+ Posts
Posts: 2026
Joined: Sun May 18, 2008 1:25 am
Location: Chicago, IL
Contact:

Re: Project Freestyle

Post by thatkid »

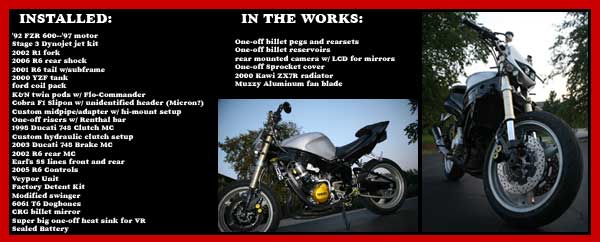
Freestyle72 wrote:We can't all afford that fancy equipment... I got about a $4000 shopping list that would have made this build a breeze. But since this is not my garage I don't really want to start filling it with those tools just yet. I am moving to my new house next month so I will start to acquire these tools.

Besides how would I have used a drill press to get that curve? Use a huge bit?

Haha, fancy? My lathe was made in 1938. Nothing fancy about it. :no

Whatever size the shock mount is. Use a bi-metal holesaw of the same dia. and it will give you the curve you need. One hole, two sides, DONE!
Image
Do YOU Scopper?

"When some people cry, it's not because they’re weak. It’s because they’ve been strong for far too long."
Freestyle72
Level 4.0
Level 4.0
Posts: 418
Joined: Sun May 10, 2009 8:23 am
Location: Milton, Ontario, Canada

Re: Project Freestyle

Post by Freestyle72 »

Got it tig'd at a shop in Oakville that Inreb directed me too. AWESOME job. The guy is aerospace certified and all that nice stuff.


Nice welds yo!

Image

Image


Mounted in the bike

Image


Subframe slid on

Image


Nut locked down!

Image

Image


Seat section done yo!

Image


Integrated tail light. Just need to make a plate holder now. I also go those plate light bolts. I have some 1/16th aluminum plate for the license plate holder

Image


Various shots

Image

Image

Image
User avatar
haro504
Level 7.5
Level 7.5
Posts: 768
Joined: Fri Aug 08, 2008 5:42 pm
Location: winchendon, ma

Re: Project Freestyle

Post by haro504 »

looks nice i wish i got the 400 frame i guess its true the grass is always greener on the otherside only thing id do is grind off the rest of the square tubing from the old subframe on the shock mount tube .
ones life is the way it is only because you allow it make it happen.
i poop my pants i poop my pants
sweekster
2000+ Posts
2000+ Posts
Posts: 2773
Joined: Tue May 13, 2008 10:52 am
Location: Perris, CA

Re: Project Freestyle

Post by sweekster »

Impressive work so far Moe. Only thing is this :

Image

As Haro said, clean that puppy up when you can.
Duane...
Bike:
1994 Yamaha FZR 1000 EXUP
Factory Pro Stage 1 Jetting | K&N Filter | Corbin Seat | ProTek Keyless Gas Cap | GSXR Mirrors
My Thread
Cage:
2005 Saab 9-7x 5.3i Arc AWD

Image


THE WIKI IS YOUR FRIEND
THE SEARCH IS YOUR SIGNIFICANT OTHER
USE THEM!!
Freestyle72
Level 4.0
Level 4.0
Posts: 418
Joined: Sun May 10, 2009 8:23 am
Location: Milton, Ontario, Canada

Re: Project Freestyle

Post by Freestyle72 »

Thanks guys I intend on grinding that off when I have the time to get to it. I am also going to powdercoat it so it doesn't rust.

So I am just working on finishing touches to get it rideable. Then I'll worry about finishing the rest on rainy days.

License plate mount. I improvised some stuff off the 09 R6 license plate stuff that I got sent erroneously to me.
The bolts on there are led lights as well.
Image
Image
Back side!
Image

Also made a spot for the regulator/rectifier
Image
Image
Image

R/r hooked up
Image
User avatar
zero9243
Level 8.5
Level 8.5
Posts: 896
Joined: Wed May 28, 2008 3:23 pm
Location: Milwaukee, WI
Contact:

Re: Project Freestyle

Post by zero9243 »

does that not need to be water proofed?
Upgrades:
  • Barnett Clutch------------------------------------------R6 Blue Dots, Front Master Brake Cylinder+Reservoir
    WP Adjustable Rear Shock----------------------------Vortex 520 Conversion with RK GB520GXW Chain
    V&H Header (4-1)--------------------------------------Swingarm Spool Mounts
    Cobra F1r Exhaust Can--------------------------------R6 Voltage Regulator
    Flo-Commander with Remote-------------------------Custom Airtech Passenger Seat
    Stage 7 Jet kit with Diffuser Caps--------------------Factory Pro Nickel Emulsion Tubes
    Wiseco 630 Kit------------------------------------------Custom Frame Slider Mounts
    Modking Hydraulic Clutch Kit--------------------------Hella Projection Headlight with Xentec HID Kit (H9 Bulb)
    Modking Aluminum Radiator Overflow Bottle--------


User avatar
PIMPMYFZR
1000+ Posts
1000+ Posts
Posts: 1282
Joined: Wed May 14, 2008 8:18 am

Re: Project Freestyle

Post by PIMPMYFZR »

man this is a badass build u got going on ... came together beautifully !!!! Now finish the damn thing allready .. And more pics ..
Image
2002 R1 9k miles , Hotbodies undertail , Chopped Hindle Hi Mount , Solo Seat cowl,Frame sliders, little yellow yamaha wheel stickers .hehe
94' 600RR SOLD**
hid xenon
airtek solo tail
time for a 1000
R.I.P DaD 2/17/09 Your in my <3 always
Post Reply