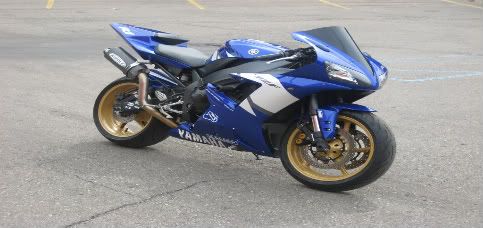
The FZ-R1 project Update:10/8/14

Got a Yamazuki or a Yamonda? This section is for those who are a little more creative...

Moderators: Site Director, FZR Forum Moderators

Post Reply
yamaha_george
5000+ Posts
5000+ Posts
Posts: 5853
Joined: Fri May 09, 2008 8:46 am
Location: west london UK

Re: The FZ-R1 project (lots of pictures)

Post by yamaha_george »

[quote="shredex"]forgot to show pics of the stay I made....


Image

yes it holds...

Shred ,

Nice idea BUT because of the vibration and the load on that pair of holes in your "nose-box" I suggest you open them up a bit and fit & weld 4 tubes to hold the mounting bolts. This will be far better holding value & spread the load as it looks to be made of alloy rather than steel.
User avatar
shredex
2000+ Posts
2000+ Posts
Posts: 2768
Joined: Sun Sep 07, 2008 10:40 am
Location: Holiday, Florida
Contact:

Re: The FZ-R1 project (lots of pictures)

Post by shredex »

ok....even more pics of the tail...but I put the r1 fairings on also

:worthlesswithoutpics:

Image
Image
Image
Image
Image
Image
Image
yamaha_george
5000+ Posts
5000+ Posts
Posts: 5853
Joined: Fri May 09, 2008 8:46 am
Location: west london UK

Re: The FZ-R1 project (lots of pictures)

Post by yamaha_george »

Shredex my boy,
That thing looks brutally fast standing still, you have outdone yourself

WELL DONE, but remember what I said about re-inforcing the holes there will be a lot of wind down force on your front end far more than with the FZR front !
User avatar
shredex
2000+ Posts
2000+ Posts
Posts: 2768
Joined: Sun Sep 07, 2008 10:40 am
Location: Holiday, Florida
Contact:

Re: The FZ-R1 project (lots of pictures)

Post by shredex »

yamaha_george wrote:Shredex my boy,
That thing looks brutally fast standing still, you have outdone yourself

WELL DONE, but remember what I said about re-inforcing the holes there will be a lot of wind down force on your front end far more than with the FZR front !

thanks george :thumbsup:

and do you mean somthing like this?

Image


im not done with the stay yet. I still have to weld on the other piece I cut to angle the guage toward me. and I want to put some reinforce strips to where the mirriors mount so thats stronger and less shaky

I wish I owned a welder and the other tools I need.

the metal guy across from our shop is letting me borrow one of his taps so I can make mounts for the tail...
Image
User avatar
PIMPMYFZR
1000+ Posts
1000+ Posts
Posts: 1282
Joined: Wed May 14, 2008 8:18 am

Re: The FZ-R1 project (lots of pictures)

Post by PIMPMYFZR »

Man you hacked the shit outta that thing .. wish i had your time bro . does the tail have an undertail ?
Image
2002 R1 9k miles , Hotbodies undertail , Chopped Hindle Hi Mount , Solo Seat cowl,Frame sliders, little yellow yamaha wheel stickers .hehe
94' 600RR SOLD**
hid xenon
airtek solo tail
time for a 1000
R.I.P DaD 2/17/09 Your in my <3 always
User avatar
shredex
2000+ Posts
2000+ Posts
Posts: 2768
Joined: Sun Sep 07, 2008 10:40 am
Location: Holiday, Florida
Contact:

Re: The FZ-R1 project (lots of pictures)

Post by shredex »

PIMPMYFZR wrote:Man you hacked the shit outta that thing .. wish i had your time bro . does the tail have an undertail ?

I will get the undertail for it soon.

im also going to be getting the ungertail cans to stick there so it doesnt look weird
Image
User avatar
megaloxana
2000+ Posts
2000+ Posts
Posts: 2282
Joined: Thu May 15, 2008 5:05 pm
Location: Hanover, PA 17331
Contact:

Re: The FZ-R1 project (lots of pictures)

Post by megaloxana »

and to think you were trying to sell her a while back...
'92 FZR 600
Airtech R1 kit \*/ 520 conversion \*/ 14F-47R gearing
K&N pod filters \*/ Stage 3 jet kit \*/ Factory Pro shift kit \*/ Full V&H SS exhaust
Custom '02 R6 undertail \*/ YZF gas tank \*/ Raised via dogbones \*/ custom flush turnsignals
Full R6 brake set-up \*/ SS lines \*/ Progressive fork springs \*/ ZX2 coilpack


ADD YOURSELF TO THE OFFICIAL FZRONLINE GOOGLE EARTH MAP :bunny :banjoman
User avatar
slayermd
Level 5.0
Level 5.0
Posts: 521
Joined: Sat Aug 09, 2008 3:20 pm
Location: Westminster Colorado
Contact:

Re: The FZ-R1 project (lots of pictures)

Post by slayermd »

Isn't there another side to the bike? The blue and black are awesome colors together. Btw, whats the deal with the upside down pipe?
User avatar
shredex
2000+ Posts
2000+ Posts
Posts: 2768
Joined: Sun Sep 07, 2008 10:40 am
Location: Holiday, Florida
Contact:

Re: The FZ-R1 project (lots of pictures)

Post by shredex »

slayermd wrote:Isn't there another side to the bike? The blue and black are awesome colors together. Btw, whats the deal with the upside down pipe?
I didnt take pics of the other side because I didnt put the fairing on that side...

and my can goes all over the place because I never rivited it bad on when I was done cleaning it...

I pulled a wheelie a week ago and the can slide right off...
Image
match417
Level 8.0
Level 8.0
Posts: 813
Joined: Sat May 31, 2008 1:02 pm
Location: Kaimuki, HI (ALOHA)!!!

Re: The FZ-R1 project (lots of pictures)

Post by match417 »

I have to agree with whoever mentioned it before, that blue and black look AMAZING together, I'm probably going to do away with the black rear/white front and make mine like that whenever i get to paint mine..i'm thinking probably just the upper side R6 fairings and front blue, with the frame and tail black. Those colors look sick together.

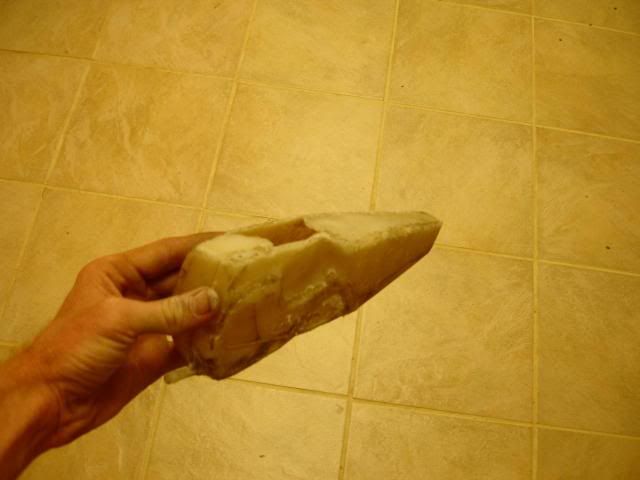
Oh, and you might be wondering what you are going to do with your reservoir, check out what I did to mine below..it took forever, and I found out that our plastic welds don't hold water, there are tiny pores that it seeps through, so I went over the welds with those small super glue tubes that stick your fingers together and now it holds water like it did before. I remolded mine to where it fits snugly to the inside of my tail fairing and it's out of the way. You might want to try the same thing with yours, but your tail looks WAAAAY more anorexic than mine does so I don't even know how yamaha fit a reservoir in it when it was stock. I call mine the elf shoe.

Image
check out my car and bike projects on http://youtube.com/match417
Image
User avatar
slayermd
Level 5.0
Level 5.0
Posts: 521
Joined: Sat Aug 09, 2008 3:20 pm
Location: Westminster Colorado
Contact:

Re: The FZ-R1 project (lots of pictures)

Post by slayermd »

match417 wrote:
Image
\

I thought that was a rock for a second.
User avatar
shredex
2000+ Posts
2000+ Posts
Posts: 2768
Joined: Sun Sep 07, 2008 10:40 am
Location: Holiday, Florida
Contact:

Re: The FZ-R1 project (lots of pictures)

Post by shredex »

for my overflow, im going to be using whatever I can find and looks good. I might even relocate it to next to the fuel pump.

I might end up doing thr same thing as you though match
Image
old_school
Level 8.0
Level 8.0
Posts: 824
Joined: Mon May 12, 2008 5:52 pm
Location: Princeton, NJ

Re: The FZ-R1 project (lots of pictures)

Post by old_school »

Nice work shedex.. I just caught up on all your updates.. Looks good but you gotta get moving if your gonna be riding in the spring
NO FZR :(
05 Yamaha R1
03 Harley Fatboy
what's next?
match417
Level 8.0
Level 8.0
Posts: 813
Joined: Sat May 31, 2008 1:02 pm
Location: Kaimuki, HI (ALOHA)!!!

Re: The FZ-R1 project (lots of pictures)

Post by match417 »

your reservoir shouldn't be lower than your radiator so the water will gravity feed out of it as needed, so I wouldn't put it by the fuel pump, basically the hose from the reservoir shouldn't be going up. It can be level, close to level or higher, but not considerably lower.
check out my car and bike projects on http://youtube.com/match417
Image
User avatar
shredex
2000+ Posts
2000+ Posts
Posts: 2768
Joined: Sun Sep 07, 2008 10:40 am
Location: Holiday, Florida
Contact:

Re: The FZ-R1 project (lots of pictures)

Post by shredex »

match417 wrote:your reservoir shouldn't be lower than your radiator so the water will gravity feed out of it as needed, so I wouldn't put it by the fuel pump, basically the hose from the reservoir shouldn't be going up. It can be level, close to level or higher, but not considerably lower.

the suction will bring it back up.

on newer bikes and my brothers f4i, the overflow is in with the motor hidden behind the side fairing...

I have plenty of room under the passenger seat.
I wont have room on the side once I get the exhaust for it.


On Todays update, I made the bracket to hold my tail light farther out to match with the tail and be able to use my seat.

I have school tomorrow and I didnt want to show up tailless...
Image
Post Reply