Page 1 of 2
Not charging properly
Posted: Sat Mar 01, 2014 3:31 pm
by aero540t
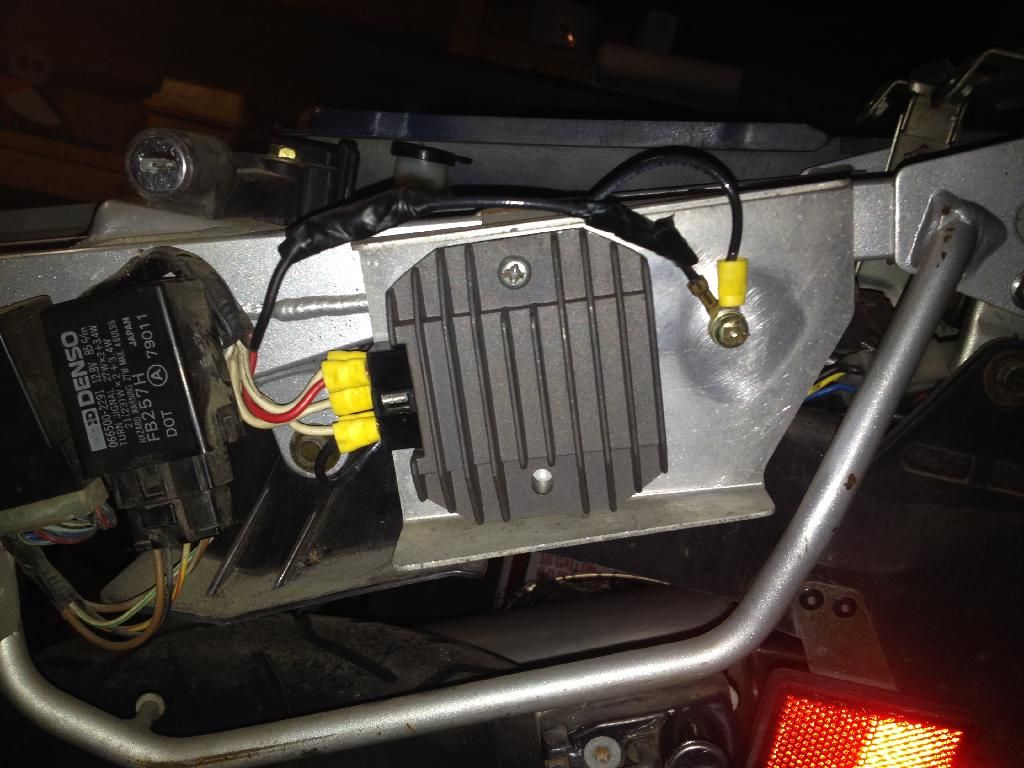
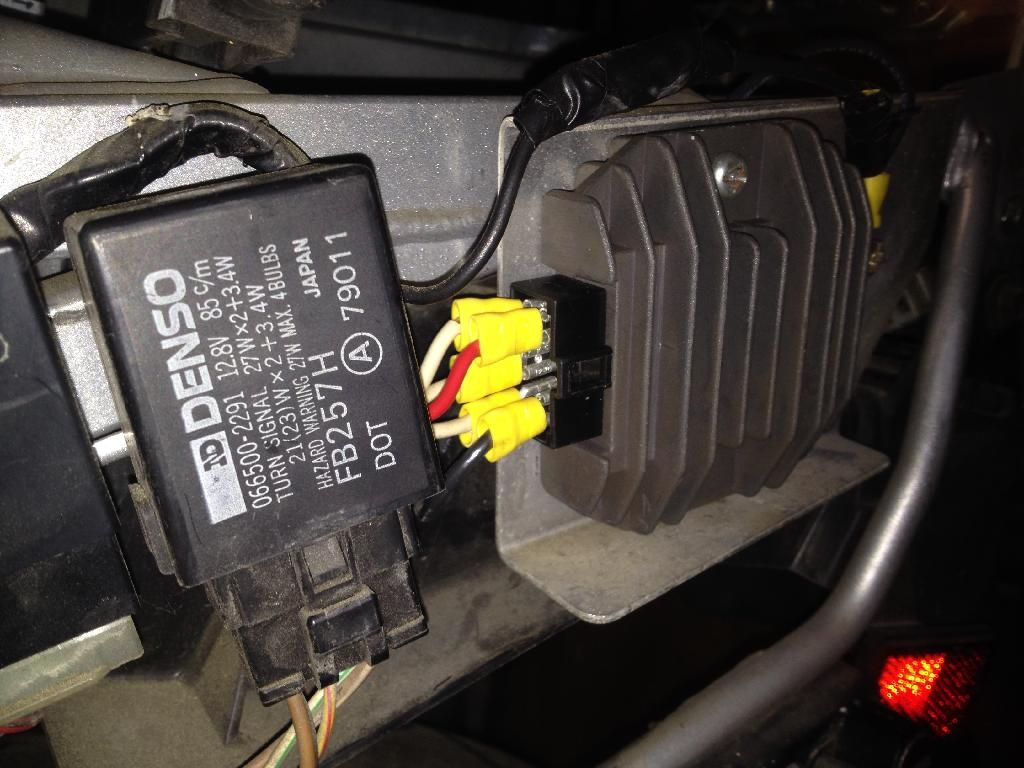
A couple years ago I made the upgrade to the newer VR and I'm pretty sure I followed directions to the T. The bike has been running fine but my battery went bad and I attributed it to not really taking care of it over the winter a couple years ago. I limped along constantly charging my bike when it was low and last fall decided to finally get a new battery (which has a bad cell and I'm replacing tomorrow). I used my voltmeter though this fall when the battery was good and could tell that it wasn't charging while running. I had it up to 3000 RPM and it was not charging to the level that it should have been. I'm wondering if you guys could check out my wiring job and see if it looks correct? I don't know if maybe I need a better ground or something. I even bought a new VR because I thought maybe the one I had was bad and it had the same effect. I just want to make sure I didn't do something wrong before looking into replacing the stator or something. Any advice would be appreciated. I can get different/better pics if needed.
Re: Not charging properly
Posted: Sat Mar 01, 2014 5:08 pm
by goosefartfan
check the stator output from the 3 white wires w/the engine running, and the resistance between each of those wires with the engine off.
make sure all your connections are rust free...maybe there's a bad connection in the wires that you spliced together.
Re: Not charging properly
Posted: Sun Mar 02, 2014 1:18 am
by DonTZ125
Confirm that your crimps are tight, and that your terminals grip the VRR pins firmly. Pay particular attention to that screwed down mess beside the VRR - when I build a VRR adaptor, I include a 12ga wire to be run direct from the VRR ground pin to the engine.
Re: Not charging properly
Posted: Mon Mar 03, 2014 5:31 pm
by aero540t
DonTZ125 wrote:Confirm that your crimps are tight, and that your terminals grip the VRR pins firmly. Pay particular attention to that screwed down mess beside the VRR - when I build a VRR adaptor, I include a 12ga wire to be run direct from the VRR ground pin to the engine.
Where do you put that ground on the engine? And where is the original engine ground? I need to take my plastics off to look closer. I noticed the ground going into the VRR wasn't gripping the pin well so I did tighten that and it is the same. Thanks for the tip. I took a little time today and my voltage at 3K RPM was about 12.8V which isn't terrible but definitely low.
I then took the negative off the battery and checked the amps and it was around .4A, which according to a chart I found on the Archives is high indicating a short or frayed wire somewhere.
I had to fix my horn a couple years ago and apparently did a crap job crimping some connectors on the existing wires and was able to pull the wire out of the crimp so I'll re-do that, but otherwise I doubt that's the cause of my problems. My bike is pretty stock with the exception of a jet kit and slipon so I don't have any aftermarket accessories pulling extra juice either.
Re: Not charging properly
Posted: Mon Mar 03, 2014 6:35 pm
by DonTZ125
The ground goes to the engine case bolts on the back; follow the ground lead forward from the battery. I've had several customers tell me they couldn't get that particular bolt off with the engine mounted; picking a nearby bolt would do the job just as well, but make sure that whatever bolt (and bolt hole) you pick is CLEAN when you attach the wire.
12.8v is what you should see with the engine OFF! Try measuring it at 5k. As goosefartfan pointed out, measure your AC voltage across the three pairs of stator wires - 1-2, 2-3, 1-3.
0.4A indicates a leak sufficient to draw your battery down while sitting, but not enough to limit your charging voltage that badly. It's another problem, but still something to investigate.
Re: Not charging properly
Posted: Mon Mar 03, 2014 6:54 pm
by aero540t
DonTZ125 wrote:The ground goes to the engine case bolts on the back; follow the ground lead forward from the battery. I've had several customers tell me they couldn't get that particular bolt off with the engine mounted; picking a nearby bolt would do the job just as well, but make sure that whatever bolt (and bolt hole) you pick is CLEAN when you attach the wire.
12.8v is what you should see with the engine OFF! Try measuring it at 5k. As goosefartfan pointed out, measure your AC voltage across the three pairs of stator wires - 1-2, 2-3, 1-3.
0.4A indicates a leak sufficient to draw your battery down while sitting, but not enough to limit your charging voltage that badly. It's another problem, but still something to investigate.
I appreciate your time with this. I haven't done much electrical work in the past but I'm decently mechanically inclined and I'm pretty good with directions so hopefully I can figure this out. I'll try measuring again at 5k and see what she reads. I should specify that I was able to get a new AGM battery yesterday so can rule that out finally.
Do I measure the AC voltage across those wires with the bike running or not? If on, what RPM range?
Lastly, for the ground, you mentioned you usually add it to the ground pin. I'm wondering if it would be the same if I added a 12g wire from the group I have on the right side of my VRR and ran that to the engine case since it would be connected to the other grounds anyway. Otherwise I'll have to snip that connector off by the pin and add another wire to it. Not a big deal, but if it achieves the same thing, it would be easier.
The real problem is finding time to do this. It's frickin cold in my garage!
Re: Not charging properly
Posted: Mon Mar 03, 2014 6:59 pm
by DonTZ125
You're measuring the AC output of your alternator across the three legs of the stator. If it ain't turning, the alternator ain't producing. Measure at 3k and 5k; you should see somewhere between 30-60VAC across each leg.
The ground wire to the engine should be dedicated - it goes from the top right pin of the VRR to the engine ground. Not stops, transfers, or lay-overs.
Re: Not charging properly
Posted: Mon Mar 03, 2014 7:34 pm
by aero540t
Understood. I might have time tomorrow to get those readings in between work. I'll have to make up a ground wire and run it directly from the pin to the engine case and lose the one I have on there now. I'll try to find time later for that, I need to take my plastics off again to get a better look. It would be nice if it was as simple as an insufficient ground. I see on your site that the ground you make is 36" so I'll probably do something like that.
Re: Not charging properly
Posted: Tue Mar 04, 2014 12:50 pm
by aero540t
In this order 1-2, 2-3, 1-3 on the white wires I got these AC voltages at 3k RPM. 0.00, 0.00, 52V. I had the VRR disconnected during this test. I didn't bother at 5k RPM because it was clear there was already a problem
Re: Not charging properly
Posted: Tue Mar 04, 2014 1:19 pm
by aero540t
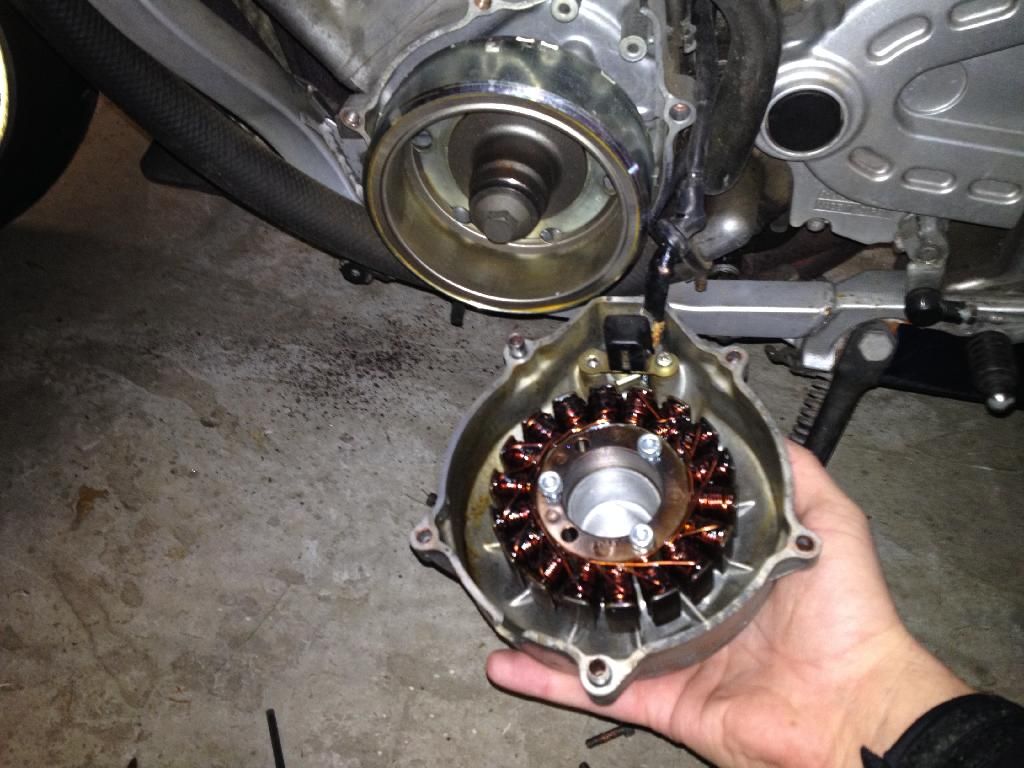
I took the stator cover off and the only thing I notice physically is it's missing a screw on the bracket for the wiring. Looks like a PO has been in here before. Should I be looking to replace the Stator at this point? I checked the impedance on the 3 white wires with the bike off and I got nothing out of the 1-2, an 2-3, but 1-3 gave me something initially and worked its way back down to 0.
Re: Not charging properly
Posted: Tue Mar 04, 2014 2:25 pm
by DonTZ125
Yeah, that'll do it ... I can't tell from the pic - do you have a white 3-way plug leading from the stator, or just a ball of electrical tape?
Re: Not charging properly
Posted: Tue Mar 04, 2014 3:22 pm
by aero540t
does this help?
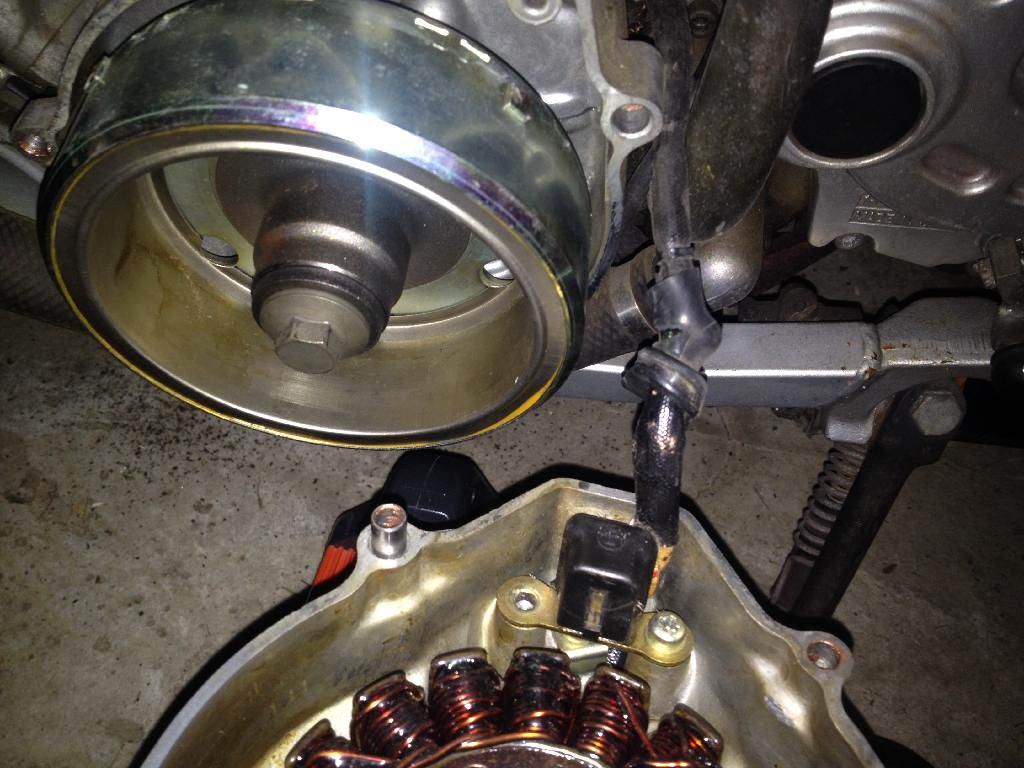
Or is the plug higher up on the harness? I can see a plug a little further up but i can't tell if it's from the stator. I was able to get that screw out even though it's stripped badly and I'll replace it and make sure to get another one for the bracket too. It doesn't look like a ball of electrical tape. It appears stock from what i can tell. The three allen screws on the stator were really tight but I got them out. Also the screw under the little black thing is really in there. I'll have to be careful I don't strip that one.
Re: Not charging properly
Posted: Tue Mar 04, 2014 4:03 pm
by DonTZ125
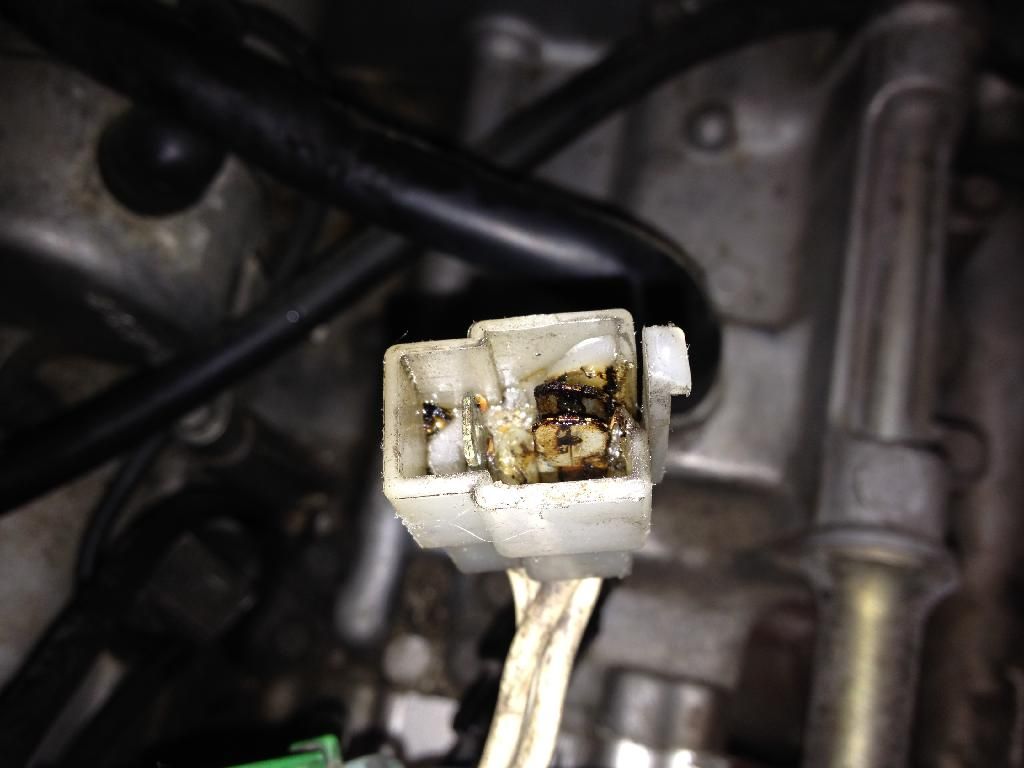
Follow that black cable along, you should come to a 2-pin connector (crank sensor) and 3-pin connector (stator). Check the stator connection for condition, security, combustion (no - really!) and continuity to the VRR on one side and the stator on the other.
Re: Not charging properly
Posted: Tue Mar 11, 2014 3:27 pm
by aero540t
DonTZ125 wrote:Follow that black cable along, you should come to a 2-pin connector (crank sensor) and 3-pin connector (stator). Check the stator connection for condition, security, combustion (no - really!) and continuity to the VRR on one side and the stator on the other.
I had to take the airbox and gas tank out to be able to reach the connectors. What a pain. But I found the problem. They melted at the connector which is why I only got readings off one of the white wires. How do I fix this? I got a new stator so that side is already taken care of, but now I'm concerned about the harness connection. Is there anything plug and play? If I got a new connection that was original somehow I could just use the connection you sell Don so it's nice and clean up to the new VRR
Re: Not charging properly
Posted: Tue Mar 11, 2014 3:43 pm
by aero540t
I also noticed my stator cover never had a gasket. Does it really need one?


