FZR/XR650R Build Thread....... It's Alive!
Moderators: Site Director, FZR Forum Moderators
Re: FZR/XR650R Build Thread
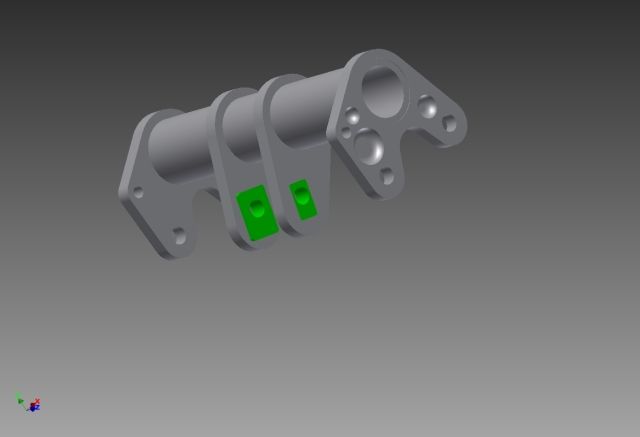
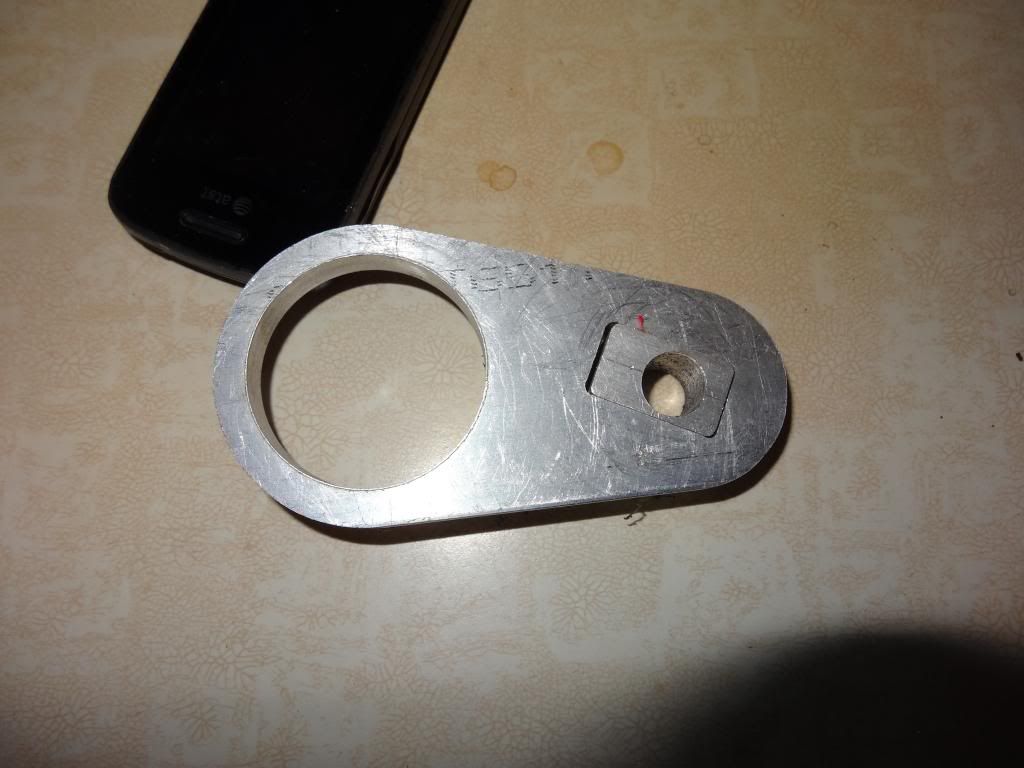
CAD Drawing of the upper shock mount that I'm making out of aluminum. The parts in green are inserts for adjustable ride height and the outer plates have extra holes for mounting the carbon fiber tail unit.
XR650R in an FZR400 chassis project
Re: FZR/XR650R Build Thread
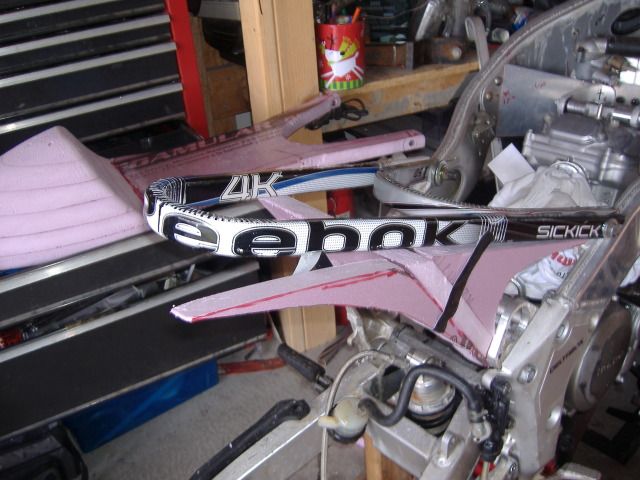
Worked on the one-piece tail today. I have to say I'm pretty happy with how the first shot looks:
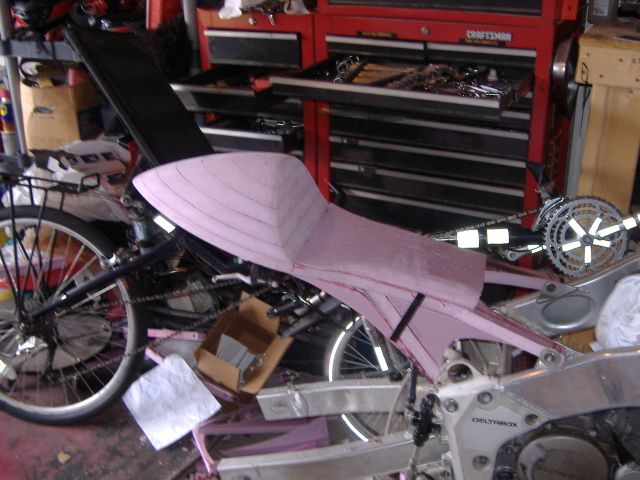
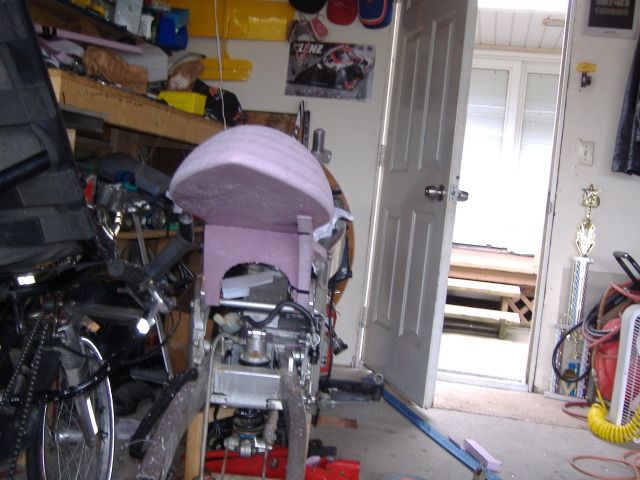
I'm not sure I'll keep the profile of the tank cover when I do the tank:
Once I get the shape exactly like I want it, I'll lay up several layers of carbon fiber and S-glass on it. Then I'll use solvent to dissolve the foam out of the inside. Then comes reinforcing the inside of the shell with structural foam and more carbon fiber.
XR650R in an FZR400 chassis project
Re: FZR/XR650R Build Thread
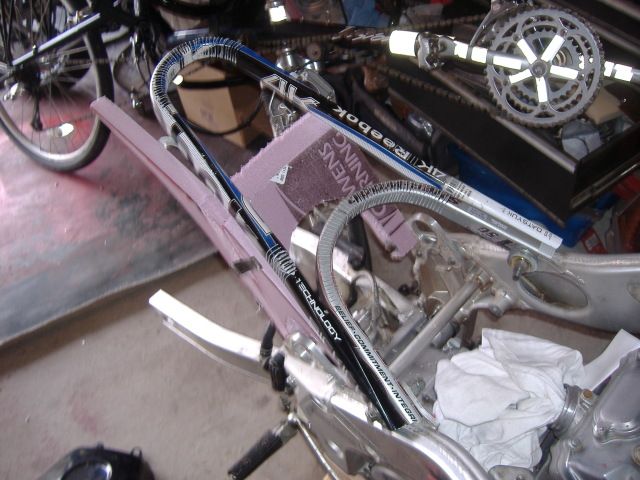
What to do with all those Hockey sticks that the NHL isn't using. Don't laugh, It'll be plenty strong and very light  :
:

XR650R in an FZR400 chassis project

Re: FZR/XR650R Build Thread
Great looking project so far. Look forward to the updates.
1990 FZR400 with some mods
-
yamaha_george
- 5000+ Posts

- Posts: 5853
- Joined: Fri May 09, 2008 8:46 am
- Location: west london UK
Re: FZR/XR650R Build Thread
Hi,tomsljr wrote:Great looking project so far. Look forward to the updates.
that is what i like to see thinking outside the box..
My thoughts on this looking at the pictures:-
The head stays need tubes to reinforce the mounting holes thro the sheet metal. From experience (suzuki TS185 ) the singles vibration level is high and if the sheet /plate metal is not thickened at the load point the holes will elongate from "chatter"
(the original mounting for the TS from suzuki eat thro in 3 months I made the plate thicker and welded anti vibe { a sandwich of tube rubber tube ) bushings into place. 28 years later the plates are Ok despite the engine sounding like a bucket of bolts LoL}
On the swing arm bolt / engine mount you need to make spacers so there is NO side slop and by the way there is NO rule that the engine centerline must be on the frame centerline an off set of 6-10 mm is fine.
That should allow you to get the sprockets to line up perfectly VERY IMPORTANT for chain wear / shock loads etc.
The seat looks nice BUT will give you a head ache as to where to stow the electrics. TWO things to be aware of the TDI/cdi unit & Voltage regulator must get breeze to keep them cool.
What air intake for fuel are you going to use? Air box will have to be the same volume for the original carb on the engine OR air filter Pod with a tube long enough to replicate the engines original air intake tract so you have a bench mark to tune from, ANYTHING else will hamper your ability to get the engine working with out flat spots in the power range.
Keep up the good work nice to see some real imagination & "go for it" attitude

Re: FZR/XR650R Build Thread
Thanks for the input George...yamaha_george wrote:Hi,tomsljr wrote:Great looking project so far. Look forward to the updates.
that is what i like to see thinking outside the box..
My thoughts on this looking at the pictures:-
The head stays need tubes to reinforce the mounting holes thro the sheet metal. From experience (suzuki TS185 ) the singles vibration level is high and if the sheet /plate metal is not thickened at the load point the holes will elongate from "chatter"
(the original mounting for the TS from suzuki eat thro in 3 months I made the plate thicker and welded anti vibe { a sandwich of tube rubber tube ) bushings into place. 28 years later the plates are Ok despite the engine sounding like a bucket of bolts LoL}
On the swing arm bolt / engine mount you need to make spacers so there is NO side slop and by the way there is NO rule that the engine centerline must be on the frame centerline an off set of 6-10 mm is fine.
That should allow you to get the sprockets to line up perfectly VERY IMPORTANT for chain wear / shock loads etc.
The seat looks nice BUT will give you a head ache as to where to stow the electrics. TWO things to be aware of the TDI/cdi unit & Voltage regulator must get breeze to keep them cool.
What air intake for fuel are you going to use? Air box will have to be the same volume for the original carb on the engine OR air filter Pod with a tube long enough to replicate the engines original air intake tract so you have a bench mark to tune from, ANYTHING else will hamper your ability to get the engine working with out flat spots in the power range.
Keep up the good work nice to see some real imagination & "go for it" attitude
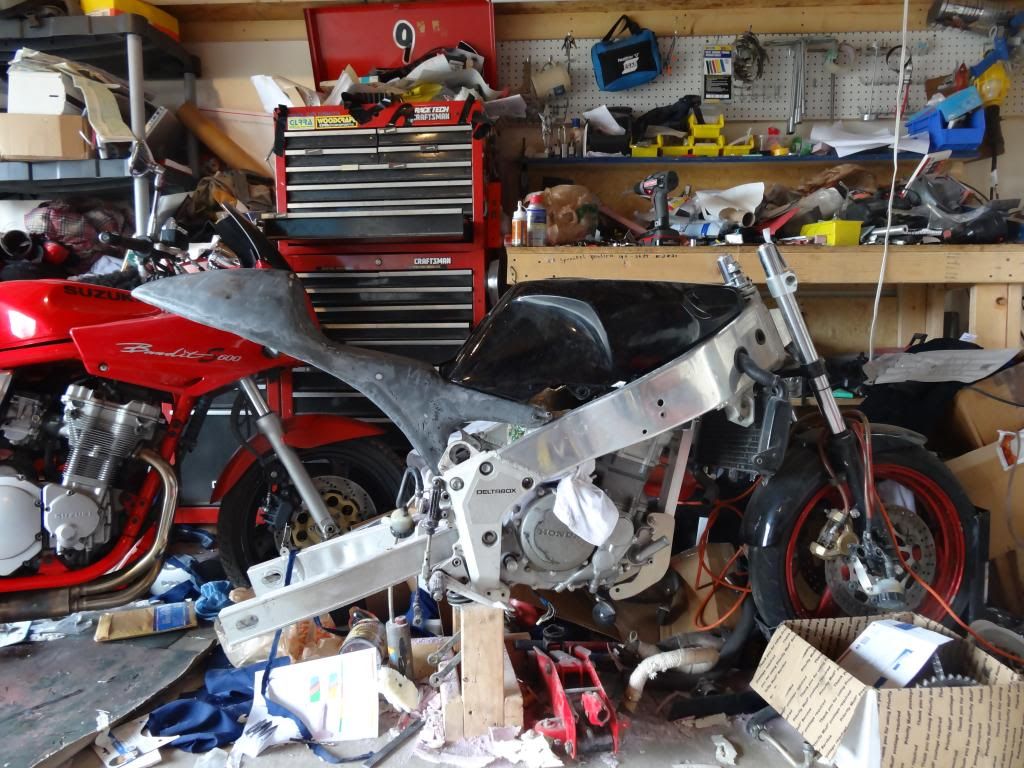
I'm not happy with how I'm bracing the head yet, so there will be more work done there, and I do have some vibration damping urethane mounts that I'm considering. I've raced a big single before so I'm definitely keeping the vibration issue in mind. This motor has a gear-driven counterbalancer so I know it won't be smooth-as-buttah but it'll help somewhat. I'll probably reevaluate the engine mounting once I get the engine running and see just how much it vibrates.
I'll be machining some Delrin spacers for the rear engine mount after I line up the chainline and locate the engine laterally. (this engine is definitely off center BTW)
As for the seat, I don't plan on putting any of the electrical components in the tail section. The electrical system is pretty simple for this motor and I have tons of room on either side of the motor for placement of electrical components.
I have a decent amount of room for the airbox when I get to that point, but right now I have a pod filter. I have a couple of monster carbs on hand to choose from for the short term, but I'm leaning toward switching to fuel injection later on. I'm using the OEM rubber intake to attach the carb in the meantime. I expect that the custom exhaust will have a bigger impact on the power curve than the intake. (I'm using Honda Racing Corp specs as a guide for fabbing the exhaust.)
XR650R in an FZR400 chassis project
-
yamaha_george
- 5000+ Posts
- Posts: 5853
- Joined: Fri May 09, 2008 8:46 am
- Location: west london UK
Re: FZR/XR650R Build Thread
hi,
great stuff, my one concern would be the electronics near the engine heads heat path.
. As for HRC specs for exhaust do they give any clue as to carb jetting adjustments / sizes?
Remember what i said about filters pods the inlet tract starts at the original air box lip plus a theoretical air curve for the "suck" of the air entering thro the pod & down the tube to the carb (I found that this curve is not that critical 3mm does not change the feel of the seat of the pants dyno )_ <BG>
If you go to FI remember you are adding to the electronics / electrics space requirement so "factor " that in from now.
The Delrin spacer will need a dust seal to protect the needle bearings on the inside UNLESS you have left enough "pipe" on the swing arm to use a second set of original dust caps.
If you do have enough meat in that area and enough space clear of the bearing outer shell it would do no harm to add grease nipples to help keep the whole bearing area lubed. Honda used to have a small flat spot over the engines swing arm bearing hole to add a grease nipple which would stop inter-metal corrosion and a dab of Copper-coat on swing arm pivot bolt would not go amiss.
Re: FZR/XR650R Build Thread
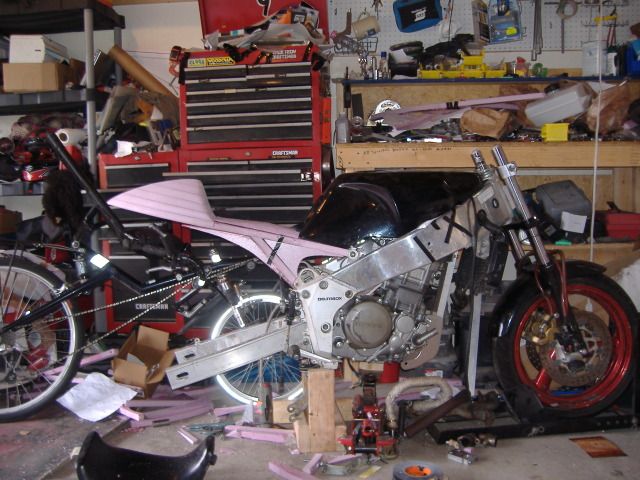
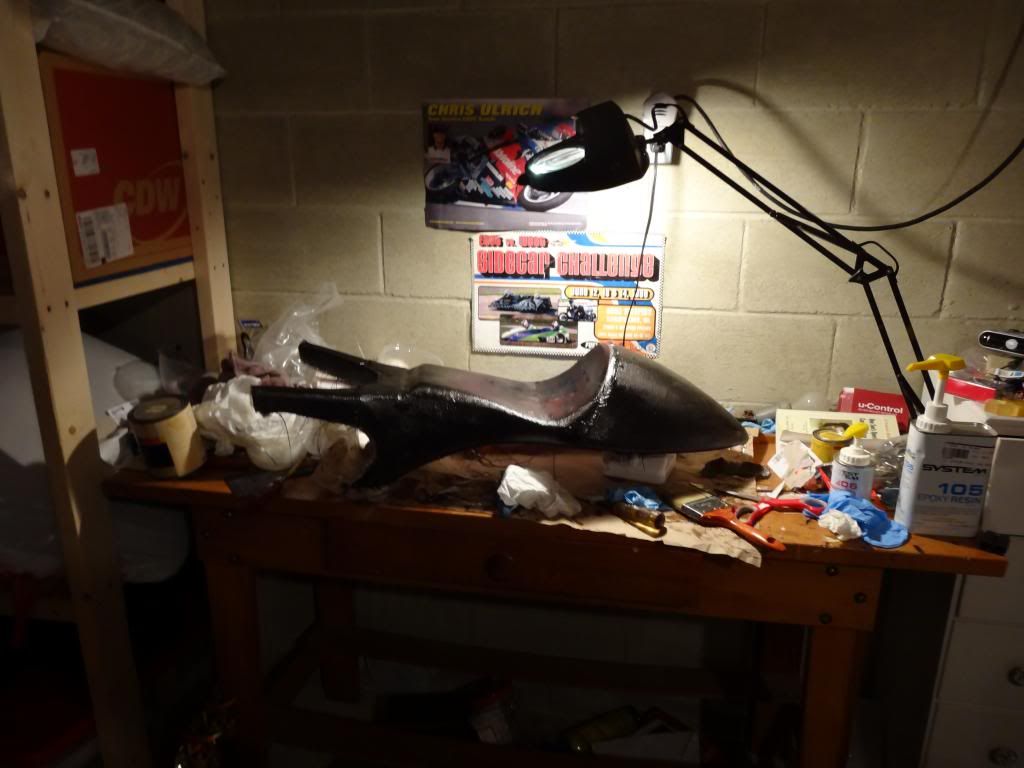
First layers of carbon fiber on the tail section:
XR650R in an FZR400 chassis project
Re: FZR/XR650R Build Thread
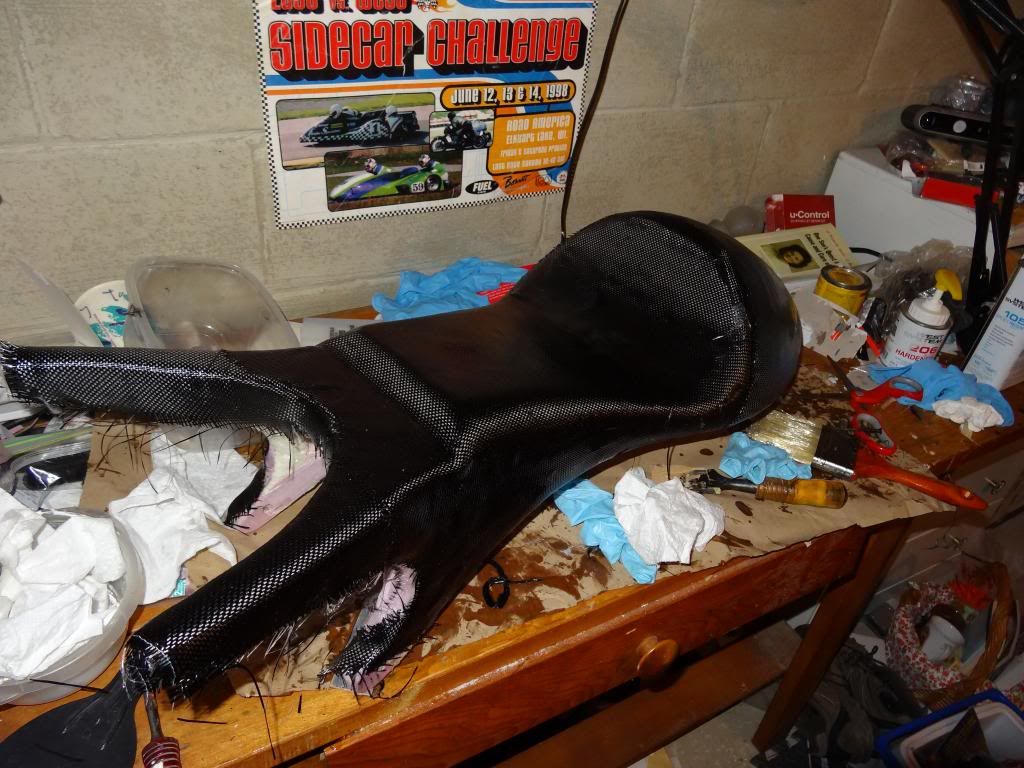
Just put the first layers of fiberglass and carbon fiber on the bottom of the tailsection last night.... I realized that I've been using too much resin to wet-out the fabric layers. As a result the weight of the tail section will probably be six or seven pounds. Still that should be a good 10 pounds less than the stock tail/subframe. I've already decided that I'm going to make a mold of the carbon tail when I'm done with it so I can make a lighter second version.
Also in the process of buying all the parts for installing a 2004 ZX6R front end on the little beast.
Also in the process of buying all the parts for installing a 2004 ZX6R front end on the little beast.
XR650R in an FZR400 chassis project
Re: FZR/XR650R Build Thread
I still have some more layers of carbon fiber to reinforce a few spots and epoxy in the mounting points, but I couldn't resist bolting up the tail ( Of course I sat on it too!  ) :
) :
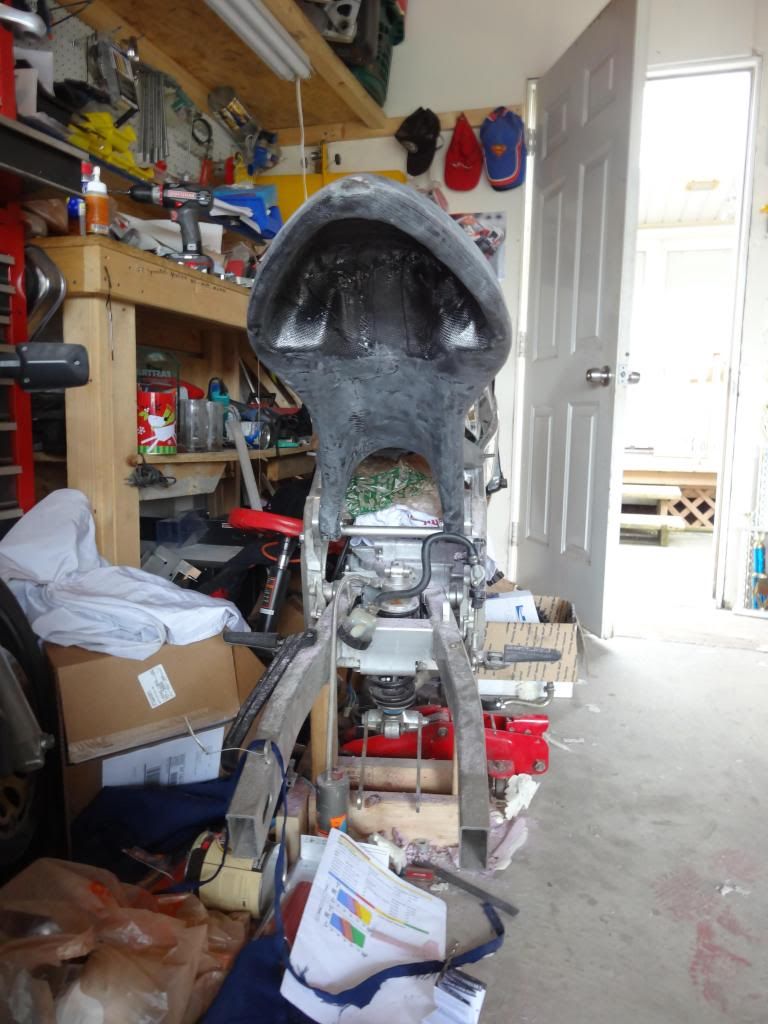
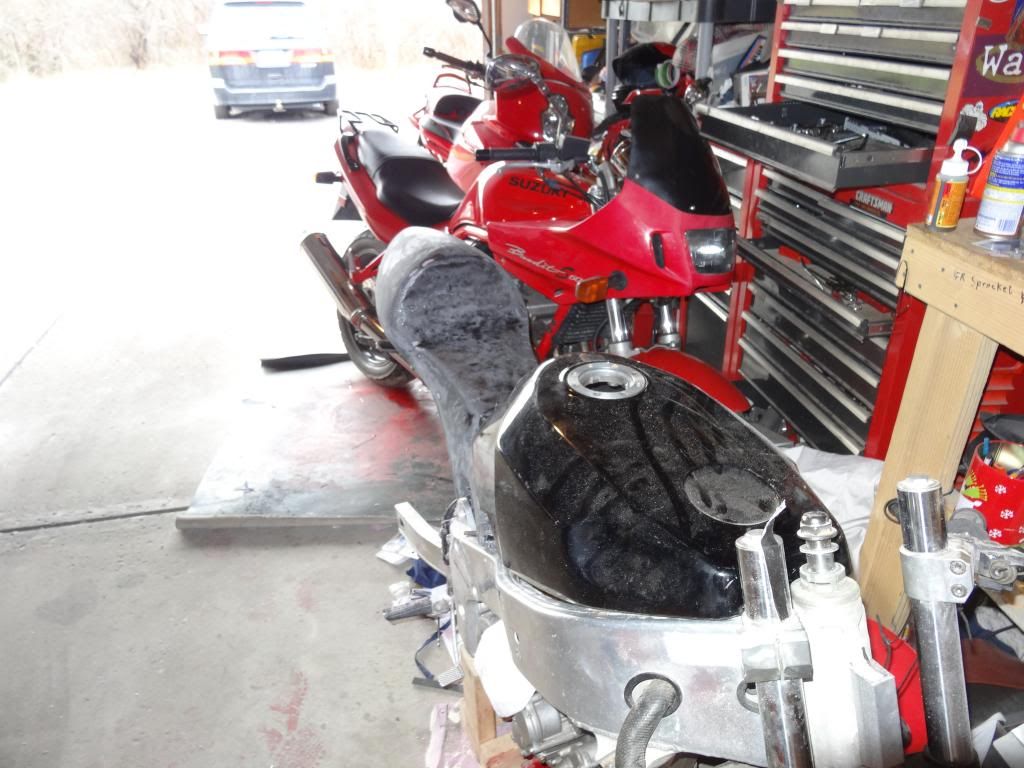
The old seat and the tail weigh the same as the entire carbon tail... Of course that excludes the 11lb steel subframe and all the rest of the crap associated with it.
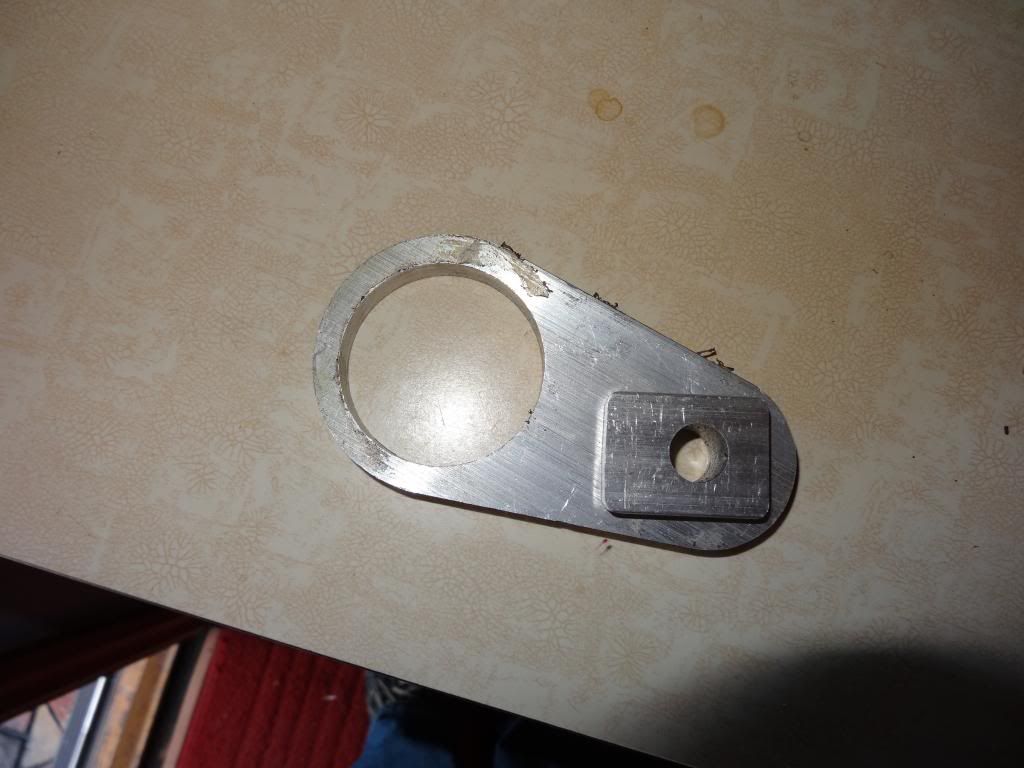
Upper shock mount and insert for adjustable ride height:
I've also been busy sourcing a replacement front end and went with a 03/04 ZX6R setup that is on it's way. I would have preferred a 2005 R6 front end, but my choice came down to the fact that I still have a few parts from my ZX racebike and the price of all the rest of the parts was good.
The old seat and the tail weigh the same as the entire carbon tail... Of course that excludes the 11lb steel subframe and all the rest of the crap associated with it.
Upper shock mount and insert for adjustable ride height:
I've also been busy sourcing a replacement front end and went with a 03/04 ZX6R setup that is on it's way. I would have preferred a 2005 R6 front end, but my choice came down to the fact that I still have a few parts from my ZX racebike and the price of all the rest of the parts was good.
XR650R in an FZR400 chassis project
-
HybridSport600

- 50+ Posts

- Posts: 91
- Joined: Mon Oct 29, 2012 4:38 am
- Location: US
Re: FZR/XR650R Build Thread
Nice! 
89 FZR 600 US- In process of Full frame up resto/Modding
94 FZR 600 US- all OEM
05 600 f4i US- Full Cylinder machining/w full Port/polished head /w stainless valves,Custom H-beam connecting rods,
low compression Weisco Forged pistons,and alcohol mix intercooled. -Sold in 09
79 XS650 US- Boyer electronic ignition, accell coil, ricks stator upgrade, Custom Flamed Ghost pearl 2 tone blue
83 Xj550 US- Full restoration- w/minor mods, Custom Candy Tangerine pearl paint, in process of Fiberglassing a solo seat
69 Vw Trike 2180cc h4 -w/ 15lbs boost paxton supercharger in progress.
79 HD Shovelhead Custom- 1340cc- Just purchased 11-3-12
Re: FZR/XR650R Build Thread
Stynning work! That tail piece is a work of art.
How difficult is carbon fibre to work with compared to fibre glass?
How difficult is carbon fibre to work with compared to fibre glass?
'88 FZR1000 Genesis
Re: FZR/XR650R Build Thread
Thanks! Carbon fiber is not that bad to work with as far as ease of use. The main difference between fiberglass and carbon fiber is when you wet them out with epoxy. With fiberglass, it turns translucent (almost clear) so it’s easier to tell when you have enough resin. With carbon fiber, you get that glossy wet look that everybody loves, but it’s easy to use too much resin and not know. Also, it’s easy to see if you have bubbles under fiberglass. With carbon fiber you have to check by a gentle poke with your finger while trying not to upset your layup. This has been a hand layup without any vacuum bagging so it’s going to have more than the optimum fiber to resin ratio. The epoxy does virtually nothing to add strength to the part, it’s job is to hold the fibers in position, so you basically want enough epoxy to fill the gaps in the fibers without bubbles or voids. That principle applies to any layup, not just carbon fiber. The next time I do it, I’ll probably use vacuum-bagging, and I would expect this to weigh between 1 and 2 pounds less.Conrad wrote:Stynning work! That tail piece is a work of art.
How difficult is carbon fibre to work with compared to fibre glass?
I am actually using a few layers of fiberglass (S-glass which is stronger than typical E-glass). Fiberglass isn’t as strong as carbon fiber, but it is tougher, so I added it to reduce the relative brittleness of the tail. Kevlar would have been even better, but it is more difficult to work with. It is difficult to cut and harder to wet-out than either carbon or glass. That’s the beauty of composites. You get the ability to combine different materials and you can orient the fibers to provide the strength where you need it. It’s a cool way to get the overall properties that you want from your part.
This part is my first shot at a structural layup and I’m pretty confident it’s overbuilt, but it’s been a great learning experience. I’m having a lot of fun!
XR650R in an FZR400 chassis project
-
Bike_junkie
- 50+ Posts
- Posts: 79
- Joined: Tue Jan 17, 2012 9:20 pm
- Location: Tacoma, wa
Re: FZR/XR650R Build Thread
I get excited each time there is an update on this bike. I am looking forward to when you can say how it rides.
cb175 cafe sitting in storage
88 fzr4/6, only the frame is stock
88 fzr4/6, only the frame is stock