
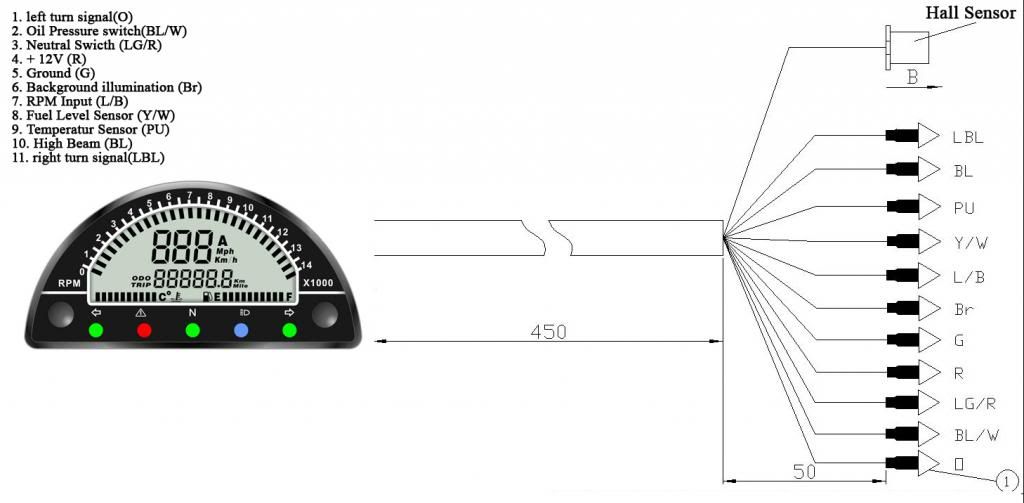
Cut off the connectors from the OEM gauges, leaving enough wire to solder and heatshrink the connector leads to the Danmoto wiring. Or use other connectors if you plan on saving or selling off your old gauges. The Danmoto comes with single lead connectors...the barrel type(male end), I think.
I made this chart for color matching all the wires to the correct circuit. Some colors may vary, I'm just going off the schematic I have. FA for factory, DM for Danmoto:
Ground -- FA= Black, DM = Green
12v + -- FA= Light Brown, DM = Red
Tach -- FA= Grey , DM = Blue/black
Temp -- FA = Green/Red, DM = Purple
Illum -- FA = Blue, DM = Brown
Hi Beam -- FA = Yellow, DM = Blue
Neutral -- FA = Light Blue , DM = Light Green/Red
Oil light -- FA = Black/Red, DM = White/Blue
L Turn -- FA = Dark Brown, DM = Orange
R turn -- FA = Green, DM = Light Blue
Note: The factory gauges turn indicator uses both wires from the L and R sides to complete the circuit and flash the single indicator. The Danmoto uses separate L and R indicators,each with it's own ground circuit, so they no longer will need to be used together to complete the circuit.
The Tach works perfectly connected directly to the OEM tach wire(gray), with no converters needed.
For the Temp sensor wiring, you will have to add a 15ohm resistor to the circuit to calibrate the senor to the gauge. The fan on mine comes on right at about 3/4 gauge.
For people that like pics, I found this diagram for the Danmoto SP-8
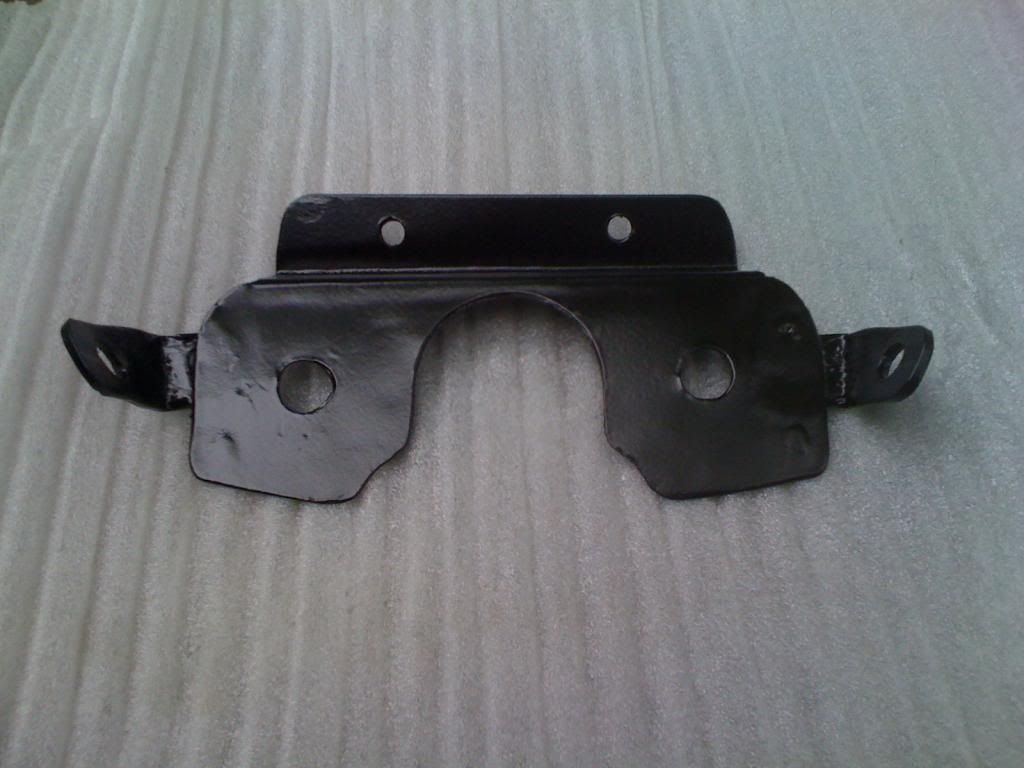
I made this bracket for mounting up the gauges. it is bolted onto the factory clip on handle bolt locations using steel spaces and longer bolts.
The magnet that is supplied with the gauges for the speed sensor is kind of wimpy and requires a hole drilled through the rotor to mount it. I opted to epoxy a larger magnet( from a telescopic magnet tool)on to the rotor, since the rotor really doesn't have a large enough flat area to drill the required size hole. The best route would be to use a magnet that is made into a rotor bolt, like what Trailtech uses...one can be ordered from the too.
To mount the sensor, I used a 1/8" piece of flat steel about 1" wide. You have to make a sight "Z" bend in it so the sensor can reach close enough to sense the magnet. I mounted it to the lower caliper bracket bolt. Looks good and the sensor is well hidden and protected behind the left fork.
Setting up the correct tire circumference is a bit off,imo. I did all the calculations and it still was off. By using the manufactures diameter to figure the circumference, it was off by 10mph(1840mm). By marking the tire and rolling it to get the total rolling distance of the tire in one revolution, it was off by about 5mph( ~1795mm).
After following my wife around in her car, so I had a dependable speed to calibrate too...I found that a setting of 1680mm is right on the money for a 110/70-17 tire. Initial factory setting is 1895mm.
This gauge set works great and I'd recommend it to anyone looking to replace or downsize their gauges.