Page 1 of 1
What not to do,when checking valve clearances
Posted: Sun Dec 12, 2010 5:09 pm
by Yamster
Did the valve clearances on an engine last week,and i thought i would post this to show you my tanfastic wrenching skills,and has a warning of what not to do.
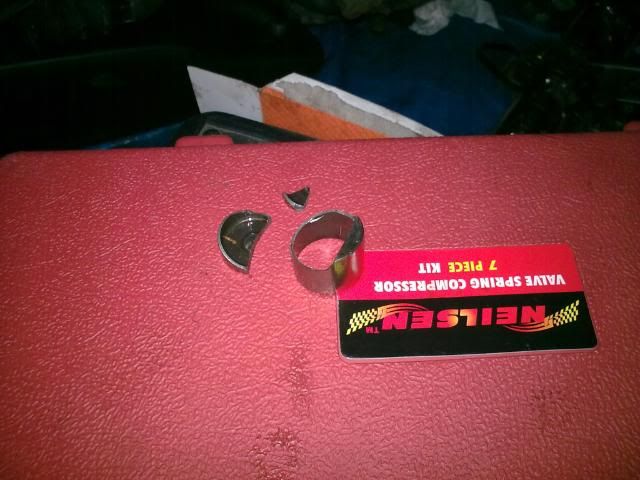
If you dont want your buckets to look like this-read on.
There is a timing mark on the cam shafts and it isn't the BIG HOLE on the front

.If you do use that hole as your timing mark,it could end up like this

.
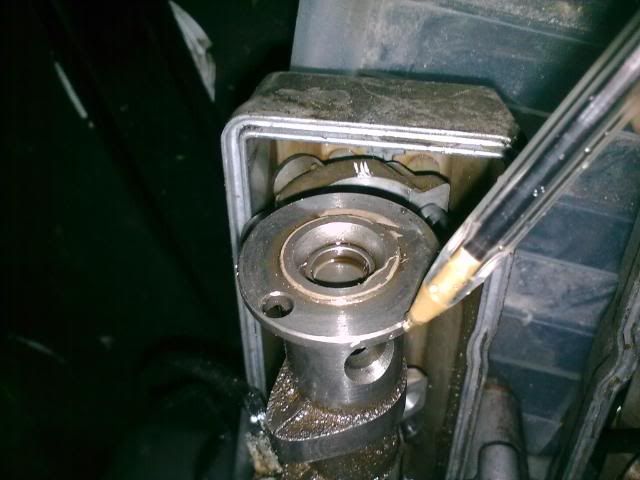
The little hole on the top of the cam shaft is the one you want(pen).
Cannot believe that i did this,but hey,thats how it goes sometimes.
The end result was a broken bucket and 2 bent valves.Luckily i had spare ones so now it looks like this
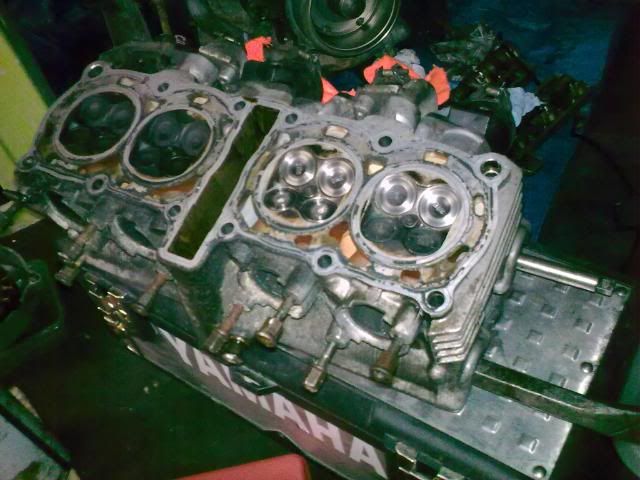
Ended up lapping 6 valves in,after doing a water test on the head.So plenty learned about 4 stroke engines in the process.
I just wish i had listened to my friend(the mechanic)when he told me to loosen the 2 bolts on the cam wheel,but being a fool,thought i knew better.
So if any one is thinking of doing a valve check-be careful yall

.
Re: What not to do,when checking valve clearances
Posted: Mon Dec 13, 2010 7:16 am
by cad600
Damn that sucks. But hey at least you were able to fix it and had the parts already.
Re: What not to do,when checking valve clearances
Posted: Mon Dec 13, 2010 5:46 pm
by reelrazor
Gaaack.
Did you crank it over with the starter??
Re: What not to do,when checking valve clearances
Posted: Mon Dec 13, 2010 6:01 pm
by Yamster
No,that was just timing it back up with the large holes and then tightning the cam guides down.Shows i can at least tighten the 12 bolts in a good progressive order

.Surprised a cam guide did'nt break.
Talking about the guides,if i had broke one,would i have been able to just replace it with one of the spares i have?
Reason i ask,is my mechanic says they are drilled"in situ"so are specific to each head

,i think that maybe was the case back in the day,but to me,machining etc has come along way with modern engines.
Over to you guys
Re: What not to do,when checking valve clearances
Posted: Tue Dec 14, 2010 9:04 am
by haunter
whoops!!
Re: What not to do,when checking valve clearances
Posted: Tue Dec 14, 2010 9:55 am
by DonTZ125
Yamster wrote:No,that was just timing it back up with the large holes and then tightning the cam guides down.Shows i can at least tighten the 12 bolts in a good progressive order
.Surprised a cam guide did'nt break.
Talking about the guides,if i had broke one,would i have been able to just replace it with one of the spares i have?
Reason i ask,is my mechanic says they are drilled"in situ"so are specific to each head
,i think that maybe was the case back in the day,but to me,machining etc has come along way with modern engines.
Over to you guys
If you mean the cam caps, they are still matched to the head. This came up in discussion a month or so ago; RR said that they are machined as a unit and then FRACTURED off. Keep in mind that these are not simply the retaining clamps, but are actually the cam bearing running surfaces.
Re: What not to do,when checking valve clearances
Posted: Tue Dec 14, 2010 3:21 pm
by Yamster
DonTZ125 wrote:If you mean the cam caps, they are still matched to the head. This came up in discussion a month or so ago; RR said that they are machined as a unit and then FRACTURED off. Keep in mind that these are not simply the retaining clamps, but are actually the cam bearing running surfaces.
I know i read on here about someone breaking one,so what will happen with the one he replaced?
I ask,cause i have got 4 off an engine i stripped,so are they now only any good for scrap?
Re: What not to do,when checking valve clearances
Posted: Wed Dec 15, 2010 4:02 am
by DonTZ125
Yamster wrote:
I know i read on here about someone breaking one,so what will happen with the one he replaced?
It may live forever, it may squeak in 100km - really hard to predict...
I ask,cause i have got 4 off an engine i stripped,so are they now only any good for scrap?
They should have gone with the head. If they didn't, then the buyer now has four mis-matched cam bearing surfaces.

Re: What not to do,when checking valve clearances
Posted: Wed Dec 15, 2010 6:15 pm
by lennyz600
i actually broke a cam adjusting my timing after setting my valves, i didnt line up the end of the cam with the slot in the head, it was only a tiny bit off. went to tighten everything down and heard a pop, my first reaction was a stripped bolt in the head, turned out to be the cam, i had to take it back out and it came out in two pieces. good thing i didnt run the bike like that. went on ebay and grabbed a whole spare head so i gots some spare parts for when im being an idiot and in a rush.
Re: What not to do,when checking valve clearances
Posted: Thu Dec 16, 2010 2:36 pm
by Yamster
lennyz600 wrote:whole spare head so i gots some spare parts for when im being an idiot and in a rush.
Thats how i got my spares.Bought a bike that came with a broken engine with it,for spares.I think the guy had just tried doing a valve clearance check,and gone sod that,drop another engine in it
.
I just took it to bits,just to give me a bit of an idea about them.Never realised that journals/cam caps etc are not inter changable
A bit more complicated than the old 2 smokes.
DonTZ125
I think i still have the head somewhere,so i will be matching the cam caps back to it,now i know about it

Next on the list of things to do,crank shaft journals
now that should be fun
Re: What not to do,when checking valve clearances
Posted: Thu Dec 16, 2010 2:41 pm
by Yamster
DonTZ125 wrote:If you mean the cam caps, they are still matched to the head. This came up in discussion a month or so ago; RR said that they are machined as a unit and then FRACTURED off. Keep in mind that these are not simply the retaining clamps, but are actually the cam bearing running surfaces.
My friend says,after there made,then there drilled,thats what makes them specific.He said if they were fractured off,the machining to get them to fit would distort the circle.Makes sense to me,and i ain't found him lacking in knowledge,to any of my questions,no matter how daft.
Re: What not to do,when checking valve clearances
Posted: Thu Dec 16, 2010 4:16 pm
by reelrazor
Yamster wrote:My friend says,after there made,then there drilled,thats what makes them specific.He said if they were fractured off,the machining to get them to fit would distort the circle.Makes sense to me,and i ain't found him lacking in knowledge,to any of my questions,no matter how daft.
Your friend is partly right.
They're cast as one piece with the head. They have a cast bore thru the cam plane. Then they are drilled
to full depth, threaded
from a specific depth,
to a specific depth. Then they are fractured off. The fracture line is decked on the head, and decked on the caps. After that, the caps are torqued down and then and only then, are they line bored. This is how the bearing surfaces are a) circular, and b) are in the same plane......and c) are specific to the head they were cast with.
The fracturing of bearing surfaces from the main body casting is a fairly old technology, and quite well developed.
Some old school outboard engines are originally manufactured with one piece connecting rods (built- up, multipart crank like the two stroke bike engines)and also have bolts to hold the rod cap (that do nothing at this point) ...BUT for repair, the rod caps are fractured off, and a split bearing cage is used to replace the original one piece unit. Then the cap bolts come into play as the raw fractured cap is torqued down over the service bearing.
Re: What not to do,when checking valve clearances
Posted: Sat Dec 18, 2010 12:43 pm
by Yamster
reelrazor wrote:Yamster wrote:My friend says,after there made,then there drilled,thats what makes them specific.He said if they were fractured off,the machining to get them to fit would distort the circle.Makes sense to me,and i ain't found him lacking in knowledge,to any of my questions,no matter how daft.
Your friend is partly right.
They're cast as one piece with the head. They have a cast bore thru the cam plane. Then they are drilled
to full depth, threaded
from a specific depth,
to a specific depth. Then they are fractured off. The fracture line is decked on the head, and decked on the caps. After that, the caps are torqued down and then and only then, are they line bored. This is how the bearing surfaces are a) circular, and b) are in the same plane......and c) are specific to the head they were cast with.
The fracturing of bearing surfaces from the main body casting is a fairly old technology, and quite well developed.
Some old school outboard engines are originally manufactured with one piece connecting rods (built- up, multipart crank like the two stroke bike engines)and also have bolts to hold the rod cap (that do nothing at this point) ...BUT for repair, the rod caps are fractured off, and a split bearing cage is used to replace the original one piece unit. Then the cap bolts come into play as the raw fractured cap is torqued down over the service bearing.
RR,bit over my head there buddy
Understand the basics now,and FTM thats enough for me
.